RV roof leaking is an issue no RV owner looks forward to. The leak can often go undetected until it’s too late to avoid more severe damage.
While some may feel it’s inevitable, leaks in your RV roof can be avoided with proper maintenance.
Here, we’ll share some helpful tips we’ve learned in keeping our home on wheels dry. Following these suggestions, the next time you’re in a heavy rainstorm, you’ll be worry-free about it raining inside!
Let’s take a look!
What Happens When Your Camper Roof Leaks?
Several different situations can happen when your RV roof leaks. You may have a leak and not even know about it in many cases. The tell-tale signs such as wet walls, stains, or a moldy smell aren’t always evident.
One of the worst things that can happen from a roof leak is mold buildup within the RV walls. Living in small spaces breathing in mold particles can be dangerous, especially for children, pets, and people with respiratory issues.
The other issue resulting from your RV roof leaking is structural damage. Wood rot is a common issue with undetected leaks. The structure of the roof itself can also be severely compromised.
Sidewall delamination is another type of damage that can occur to the structure of the RV. Bubbles or blisters visible on interior or exterior wall surfaces are sure signs your rig is suffering water damage.
Whether your RV is brand new or used, it can suffer water leaks if its seams aren’t tight and properly sealed. RV manufacturers often hastily finish construction and rush rigs to market without double-checking the seals.
Plus, used RVs are often sold without prior owners even knowing there are water leaks in the roof. Or, in some cases, these sellers do know but don’t disclose it to buyers.

How to Prevent Your RV Roof from Leaking
Fortunately, there are preventive measures you can take to keep your RV roof leak-free.
Visual Inspection
At a minimum, visually inspect your RV roof twice a year. Some RV owners recommend doing a thorough check every three months. This means getting up on your roof and checking that every seam and hole is adequately sealed.
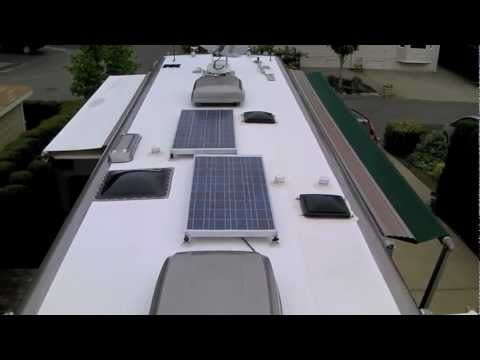
Adding solar panels, WiFi antennas, storage racks, or other additional hardware on your roof is even more reason to inspect your roof regularly. You’ll want to make sure any sealant previously used isn’t cracking or hasn’t been properly laid.
It’s also a good idea to get up on your roof after your RV has been exposed to heavy rain, hail, or wind. Flying tree branches, debris, or large hail could potentially cause damage to your roof.
Clean Your Roof
Regularly cleaning your RV roof can help prevent future leaks. Pay close attention to areas around those additions you’ve added. Wipe away debris around any sealed seams and drill holes.
Keep Supplies on Hand
Having the right supplies to address potential leaks or damage to your roof can help prevent leaks. At a minimum, keep caulking and patching tape handy so that you can make necessary repairs yourself.
Most RV owners learn the more they can address simple maintenance issues, the less they’ll have to spend on major repairs down the road.

What To Do If You Find a Leak in Your Camper Roof
If you do discover a leak, don’t panic! In the best-case scenario, you’ll catch it right away and can stop future damage from happening.
Friends of ours discovered a leak during a heavy rainstorm in their brand new RV. Drips were visible inside from the seam between the cab and coach. Once the rain stopped, they climbed onto the roof with repair tape to seal the seam. They first dried the area with towels then applied the tape across the entire seam.
Our friends were lucky because their repair stopped future water from entering the poorly sealed seam. They eventually had a trained professional inspect the area to make sure there wasn’t internal damage, which there wasn’t.
Another method to stop a roof leak in your RV is to replace previously-laid caulking. If you’ve discovered a leak, some caulking on the roof likely cracked. You’ll want to remove the old caulking and re-seal the area.
We can’t stress enough that regularly inspecting your RV roof will help prevent you from becoming an unhappy camper.
Pro Tip: Unsure if you can walk on your RV roof? We uncovered if it could harm your RV.
What’s the Best Way to Seal Your RV Roof?
The first thing you’ll want to know for properly maintaining your RV roof is knowing what kind of material it’s made from. Depending on the type of RV you own, they can be rubber, fiberglass, or metal. Check with the manufacturer if you’re unsure what material your roof contains.
Different RV roofs will require specific types of sealants. Choosing the wrong sealant for your roof could cause unintended damage.
Our friends mentioned above kept EternaBond tape on hand. Experienced RVers don’t recommend it for extensive repairs but can seal minor issues. You can use this tape on many different areas of your RV, so we recommend keeping a roll in your toolbox.
You can also use liquid sealants and coating to protect your RV roof from leaks. If you go the re-coating route, you’ll want to clean and prime the roof before applying the coating.
Make sure to allow plenty of time for the coating to cure before repainting the roof. In some cases, it’ll need a few weeks for proper curing.

How Much Does It Cost to Reseal Your RV Roof?
Depending on the type of roof you have and the extent of resealing needed, the costs can vary. Of course, doing it yourself versus having a professional do it will also determine overall costs.
There’s also a difference in cost between simply resealing versus recoating an entire roof.
If you need to reseal your RV roof, doing it yourself with the proper caulking and sealants can run $200 to $300. If you get it professionally done, you’re looking at a minimum of $600 to $800. That’s quite a big jump in price, so opting to reseal it yourself may be the better option.
Recoating your entire roof is a much larger job. If you feel up to the task, you’re likely to spend around $500. Looking at a professional recoating will likely run well over $1,000.
Weighing out the pros and cons of doing the job yourself versus having a professional do the work is something every RVer faces, whether it’s for roof repairs or any number of other fixes we inevitably face.
Pro Tip: It will always be cheaper to reseal or repair your RV roof instead of replace it. We calculated out just How Much Does A Camper Roof Replacement Cost so you can plan your budget.
You Can Keep Your RV Dry
Following the steps we mentioned above can keep you and your fellow RV dwellers happy, healthy, and dry!
If you’ve faced leaks in your RV roof, we want to hear from you. How did you handle it? Tell us your tips in the comments!
Discover the Best Free Camping Across the USA
To be honest with you, we hate paying for camping. There are so many free campsites in America (with complete privacy).
You should give it a try!
As a matter of fact, these free campsites are yours. Every time you pay federal taxes, you’re contributing to these lands.
Become a FREE CAMPING INSIDER and join the 100,000 campers who love to score the best site!
We’ll send you the 50 Best Free Campsites in the USA (one per state). Access the list by submitting your email below: