We knew nothing about Fiber Stream campers when we stumbled upon the Craigslist post that led us to our “home on wheels.” However, the breadbox shape bubbled front window, and dual axel immediately caught our attention and intrigued us to do some research.
We purchased our 1985 Fiber Stream without hesitation and have been thrilled to be part of this small community of owners and enthusiasts.
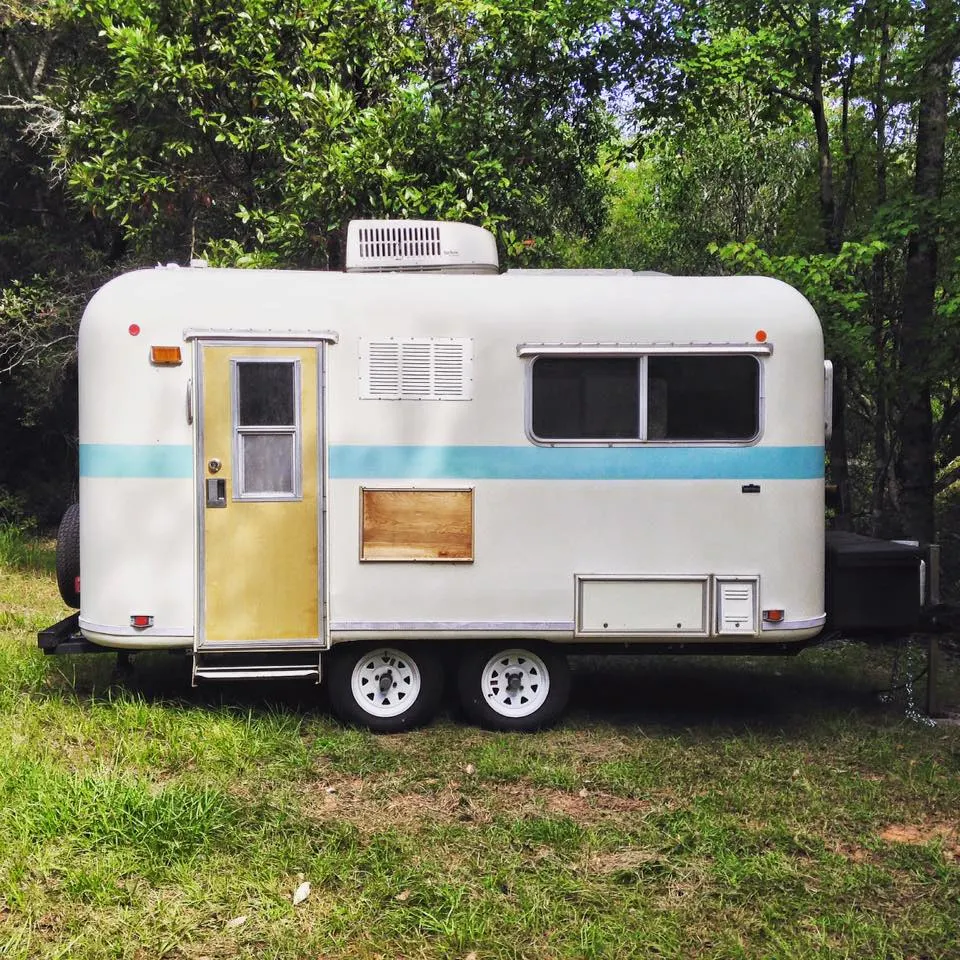
The Fiber Stream History

The Fiber Stream Company began in San Diego in 1975. It was individually manufactured by three people – a husband/wife team (the Lenards) and one additional employee. The company had a short 11-year run and relocated two times (Mira Loma & Fontana).
It is unknown how many Fiber Streams were produced throughout the years, but the number must be small – we’ve yet to see another in person.
The history of this company is sparse. Details can be found among fiberglass camper message boards and deep internet surfing. We’ve found that FiberglassRV has the most active and helpful community.
The Main Fiber Stream Camper Model

Fiber Stream only made one model in their 11 years of manufacturing: a 16-foot, dual axel camper made from a fiberglass “molded-in-one-piece” body. The company’s 1985 advertisement reads, “Made for those that want class with economy”.
The campers have a front end, U-shaped dinette that converts into a king size bed. A bathroom with shower and full size closet are located at the opposite end of the camper.
The kitchen consists of a range with oven and double stainless steal sink. There are four larger windows in the living area, and one small window in the bathroom.
The Specs of our 1985 Fiber Stream Camper
Here are the specs listed on the original sale material for our 1985 Fiber stream.
- Overall Length – 16’
- Overall Width – 80”
- Approx Weight – 1740 lbs
- 480 x 12” Tandem Axel
- Electric Breaks
- 15 Gal. Fresh Water Capacity
- 6 Gal. Hot Water Heater
- 140lbs Tongue Weight
- 76” Head Room
- 15” Ground Clearance

We’ll Help You Find the Best Free Camping in the USA
You should give it a try!
As a matter of fact, these free campsites are yours to enjoy. Every time you pay federal taxes, you’re contributing to these lands.
Become a FREE CAMPING INSIDER and join the 100,000 campers who love to score the best site!
We’ll send you the 50 Best Free Campsites in the USA (one per state). Access the list by submitting your email below:
We have owned our Fiberstream for four years now. We have put a lot of miles on her. We know of one couple that have owned one for about 15 years and have done a lot of remodeling of theirs. Here on the west coast we have seen three other trailers. When we got ours we got about five pages of original information that came with the trailer, talking about the specs and advantages. One of my favorite lines is “the interior designed for women by a woman provides ease of movement and accessibility for everything.” We also have the original pre take off check list from the dealer who first sold it, plus the sheet on the propane/electric hot water heater, water system, electrical control center, breaker system, and furnace. If you are interested in any of these let us know, we could scan them and email them to you.
I noticed that you had a problem with the window leaking. When we would get stuck in a rain storm while driving we would experience leaks in the front window and our bed would get wet. Finally DH took the window out and discovered that there is not a framework holding the window and when the caulking got old it allowed the fiberglass to bend inward enough to let water in. We have resealed the window and replaced the same window and our last trip we drove through a bad storm and found it to be dry inside when we arrived.
Hey! Email us some pics and description and we’ll share it with our 12,000 FB fans! [email protected]
We have a 1981 Fiberstream. Have owned it for about 9 years. We don’t travel with it too much but all 4 tires are mismatched load range. they are 4.80 x 12.
Can someone tell me the load range I should replace them with? The rims are kind of rusty so I am considering buying tires mounted on rims.
Thank you.
Hi, I just bought a 1986 from a friend who parents bought it new. love to get the spec manual for this trailer, I am esp interested in the black and gray water tank capacities. my email in [email protected]
thanks! Dave
The rooftop air unit on my 1981 Fiber Stream quit working so I removed it. But I would like to find out from someone how to take the sag out of the roof. I have covered the opening until I decide if I should replace it or not.
We have one for sale… that we purchased for our daughter but now she is moving and won’t be able to renovate and enjoy it. $3200. Here’s the link to where we have it for sale: https://www.facebook.com/marketplace/item/570724347073655/
Hey guys.. followed your adventures a few years ago (your early yrs) and really liked your little Fiber Stream. Ran across this today & just wanted to say hi.. We are proud owners of 14′ Camp Lite.. try to get out/about as often as we can.
Hope you & your family is well.. Leo
Love your little cutie..I’ve never seen one like it.We just bought a 2007 Skyline Nomad 150ltd,and it’s time to add a generator..we want to go solar and need recommendations. Any information would be greatly appreciated.