Proper waste management is a crucial aspect of RV ownership. Handling your RV’s black tank correctly not only ensures a hygienic living environment but also prolongs the life of your vehicle’s plumbing system.
This comprehensive guide explains what a black tank is, the tools you’ll need, safety precautions, step-by-step instructions, and tips on finding RV black tank dump stations.
Understanding the RV Black Tank
What Is a Black Tank?
The black tank is an essential component of your RV’s waste management system. It is a holding tank specifically designed to store sewage waste from your RV’s toilet.
Unlike the gray tank, which collects water from sinks and showers, the black tank deals exclusively with human waste and toilet paper. Understanding its function and maintenance is vital to prevent unpleasant odors, blockages, and potential health hazards.

How Does It Work?
When you flush the toilet in your RV, the waste and toilet paper are transported directly into the black tank. The tank is vented to the outside to allow gases to escape, minimizing odors inside the RV.
It has a release valve at the bottom, which, when opened, allows the contents to flow out through a sewer hose into an appropriate waste disposal system.
Importance of Regular Maintenance
Regular dumping and cleaning of the black tank prevent the buildup of solids and paper, which can harden over time and cause clogs.
Neglecting proper maintenance can lead to costly repairs and an unpleasant living environment.
Tools and Supplies You’ll Need
Essential Equipment
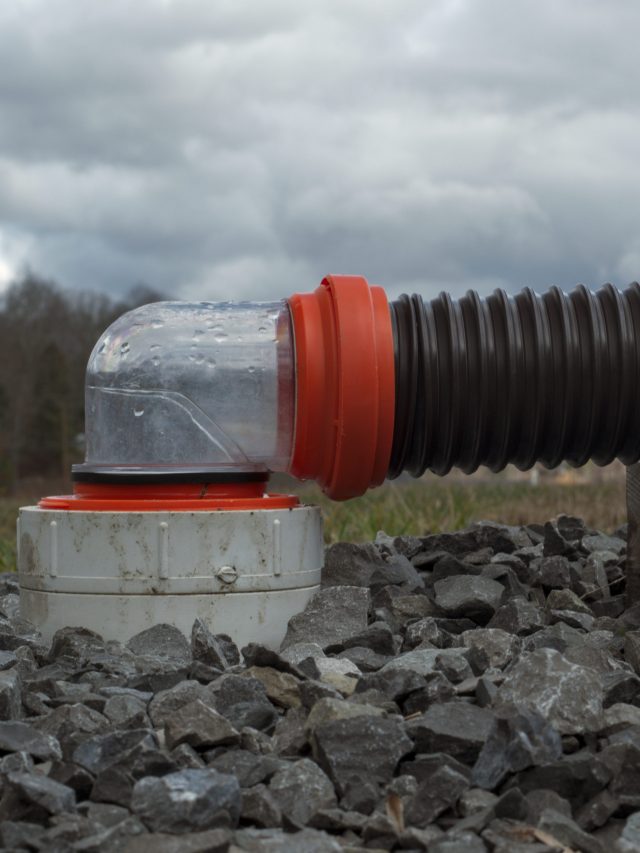
- Sewer Hose: A high-quality, durable sewer hose is non-negotiable. Opt for a hose with a transparent elbow or adapter; this allows you to see when the water runs clear during flushing.
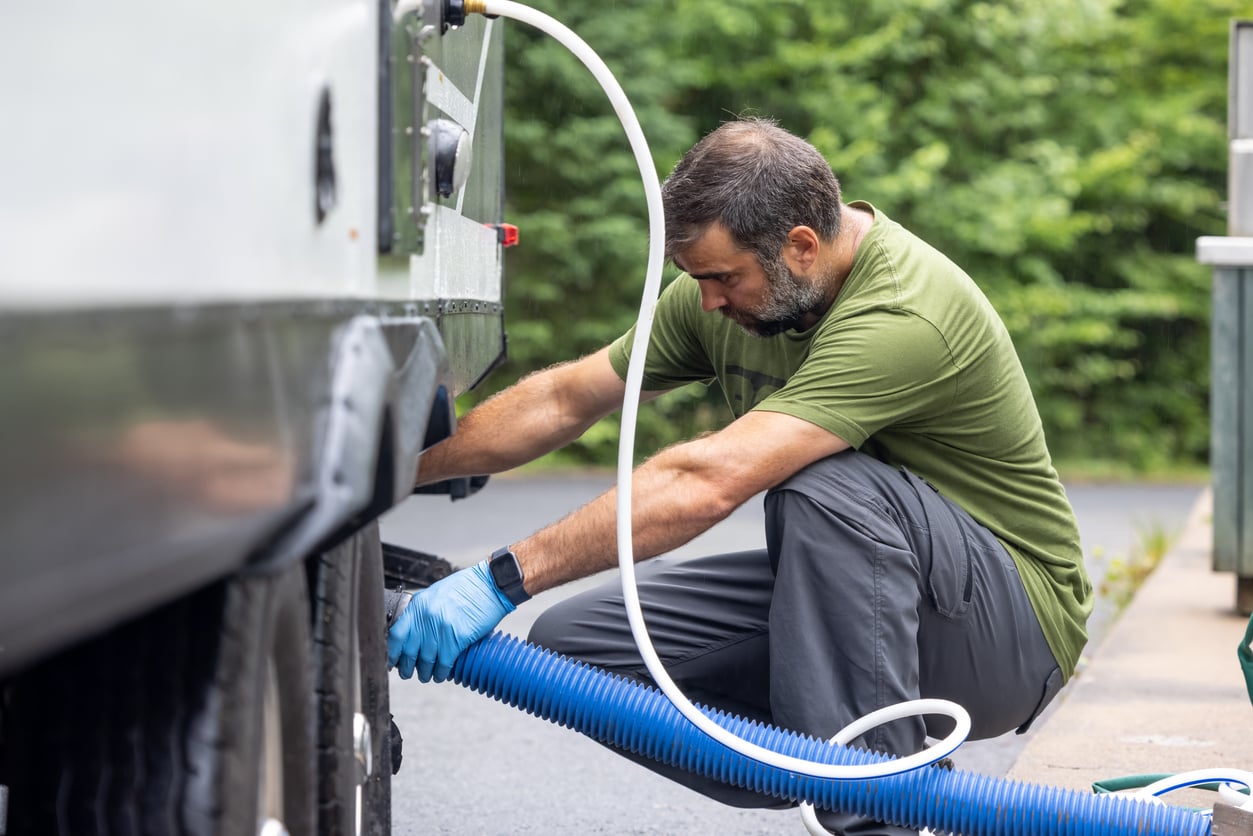
- Gloves: Disposable rubber or latex gloves protect your hands from direct contact with waste and harmful bacteria.
- Sewer Hose Support: This support system ensures a steady downward slope from your RV to the dump station, facilitating efficient drainage.
- Sewer Hose Adapter: A fitting that connects your sewer hose securely to the dump station inlet, preventing leaks and spills.
- Dedicated Water Hose: A separate hose used exclusively for cleaning tasks, such as rinsing the sewer hose and flushing the black tank. Never use your potable water hose for this purpose.
- Protective Eyewear: Safety goggles or glasses shield your eyes from potential splashes during the dumping process.
Additional Accessories
- Tank Rinser or Flush Wand: A device that attaches to your dedicated water hose, allowing you to spray the inside of your black tank to remove residual waste.
- Disposable Waste Bags: For safe disposal of used gloves and any other contaminated items.
- Hand Sanitizer: An alcohol-based sanitizer for cleaning your hands after the process, especially if immediate access to soap and water is unavailable.
Safety Precautions
Personal Protective Measures
- Wear Protective Gear: Always wear gloves and consider using protective eyewear to guard against splashes of waste or cleaning chemicals.
- Proper Hygiene: After completing the dumping process, thoroughly wash your hands with soap and water, even if you wore gloves.
Equipment Handling
- Avoid Cross-Contamination: Use separate hoses for drinking water and waste-related tasks. Clearly label each hose to prevent confusion.
- Inspect Equipment: Regularly check your sewer hose and connections for signs of wear, cracks, or leaks. Replace damaged equipment immediately.
Environmental and Legal Considerations
- Follow Local Regulations: Dumping waste improperly can result in hefty fines and environmental damage. Always use designated dump stations.
- Be Considerate: Keep the dump area clean for the next user. If a spill occurs, clean it up promptly and thoroughly.
Situational Awareness
- Secure the Area: Keep children and pets away from the dumping site to prevent accidents and exposure to hazardous waste.
- Weather Conditions: Be cautious during adverse weather. Rain can make surfaces slippery, and wind can cause splashes or blow contaminants.

Step-by-Step Instructions
1. Preparation
Park Your RV Correctly
- Align Your RV: Position your RV so that the black tank outlet is as close as possible to the dump station inlet. This reduces the length of the sewer hose needed and minimizes the risk of leaks or spills.
- Level the RV: If possible, ensure your RV is slightly tilted towards the outlet side to facilitate complete drainage of the tanks.
Gather Your Equipment
- Check Your Supplies: Ensure all necessary tools and supplies are readily accessible and in good condition.
- Put on Protective Gear: Wear disposable gloves and protective eyewear before handling any equipment.
2. Connecting the Sewer Hose
Attach to the RV
- Secure Connection: Firmly attach one end of the sewer hose to your RV’s black tank outlet. Twist the bayonet fittings until they lock into place.
- Check the Seal: Ensure the connection is tight to prevent leaks.
Attach to the Dump Station
- Use the Sewer Hose Adapter: Insert the sewer hose adapter into the dump station inlet. Some dump stations require a threaded connection; make sure you have the appropriate adapter.
- Prevent Hose Movement: Place a heavy object or use a locking mechanism to keep the hose and adapter securely in the dump station inlet.
3. Using the Sewer Hose Support
- Set Up the Support: Place the sewer hose support under the hose, starting from the RV outlet and extending to the dump station inlet.
- Create a Downward Slope: Adjust the support to ensure a consistent downhill angle, promoting efficient waste flow.
4. Dumping the Black Tank
Open the Valve Slowly
- Pull the Valve Handle: Gently pull the black tank valve handle to the open position.
- Monitor the Flow: Listen and watch for the waste flowing through the transparent section of the hose if available.
Allow Complete Drainage
- Wait Patiently: Give the tank ample time to empty fully. Rushing this step can leave residual waste in the tank.
- Tap the Tank (Optional): Lightly tap the side of the tank to dislodge any waste that may be sticking to the walls.
5. Flushing the Black Tank
Use a Tank Rinser or Flush Wand
- Connect the Rinser: Attach your dedicated water hose to the tank rinser or flush wand.
- Insert the Device: If using a flush wand, carefully insert it into the toilet and down into the black tank.
Rinse Thoroughly
- Activate the Water Flow: Turn on the water supply to the tank rinser or flush wand.
- Move the Device Around: If possible, move the rinser or wand to reach different areas inside the tank.
- Monitor the Outflow: Watch the sewer hose until the water runs clear, indicating that the tank is clean.
6. Closing the Black Tank Valve
- Seal the Tank: Push the black tank valve handle back in completely to close it.
- Double-Check: Ensure the valve is fully closed to prevent leaks while driving.
7. Dumping the Gray Tank
Repeat the Process
- Connect the Gray Tank: If your RV has separate valves for the gray and black tanks, repeat the connection process for the gray tank.
- Open the Gray Tank Valve: Pull the valve handle to release the wastewater.
Benefit of Dumping the Gray Tank After the Black Tank
- Clean the Sewer Hose: The soapy water from the gray tank helps flush out any remaining waste in the sewer hose.
- Reduce Odors: It minimizes residual odors in the hose and equipment.
8. Disconnecting and Cleaning Equipment
Detach the Sewer Hose Carefully
- Disconnect from the RV First: Gently remove the sewer hose from the RV outlet, keeping the end elevated to prevent spills.
- Cap the RV Outlet: Place the cap back on the RV’s waste outlet securely.
Disconnect from the Dump Station
- Remove the Adapter: Take out the sewer hose adapter from the dump station inlet.
- Handle with Care: Keep the open end of the hose elevated.
Rinse the Sewer Hose and Equipment
- Use the Dedicated Water Hose: Rinse the inside and outside of the sewer hose thoroughly.
- Clean the Adapter and Support: Rinse all accessories used during the process.
- Avoid Splashing: Be mindful to prevent contaminated water from splashing on you or the surrounding area.
9. Storing Equipment Properly
- Dry the Equipment: Shake off excess water and allow the hose and accessories to air out briefly if possible.
- Use a Storage Container: Place the sewer hose and related items in a dedicated storage container or compartment.
- Separate from Fresh Water Supplies: Ensure that waste disposal equipment is stored away from hoses and containers used for drinking water.
10. Final Clean-Up
Dispose of Protective Gear
- Remove Gloves Carefully: Avoid touching the outside of the gloves with your bare hands.
- Use Waste Bags: Place used gloves and any contaminated trash in a sealed bag and dispose of it properly.
Sanitize Yourself
- Wash Hands Thoroughly: Use soap and warm water to wash your hands for at least 20 seconds.
- Use Hand Sanitizer: If soap and water are unavailable, use an alcohol-based hand sanitizer.

Finding RV Black Tank Dump Stations
Planning Ahead
- Research Before Traveling: Identify dump stations along your route to avoid last-minute searches.
- Use Apps and Websites: Utilize resources like Sanidumps, RV Dumps, and AllStays to locate dump stations.
Common Locations
Campgrounds and RV Parks
- Onsite Facilities: Most campgrounds provide dump stations for guests. Some allow non-guests to use the facilities for a fee.
- Full Hook-Up Sites: If staying overnight, opt for sites with full hook-ups to dump your tanks directly.
Travel Centers and Truck Stops
- Convenient Locations: Chains like Flying J, Pilot, and Love’s often have dump stations available 24/7.
- Membership Benefits: Some offer discounts or perks for members of their loyalty programs.
Rest Areas and Public Facilities
- Highway Rest Stops: Certain rest areas, especially in RV-friendly states, provide free or low-cost dump stations.
- Municipal Waste Facilities: Some towns offer dump stations at public parks, wastewater treatment plants, and public works facilities.
Tips for Using Dump Stations
- Check Availability: Operating hours may vary, and some stations might be temporarily closed for maintenance.
- Understand Fees: Be prepared to pay a small fee; have cash or appropriate payment methods on hand.
- Follow Rules: Adhere to any posted guidelines to ensure the facility remains available for all users.
Additional Tips and Best Practices
Tank Treatment Products
- Use Enzyme Treatments: These products break down waste and toilet paper, reducing odors and preventing clogs.
- Avoid Harsh Chemicals: Some chemicals can damage your tank or harm septic systems at dump stations.
Regular Maintenance
- Monitor Tank Levels: Use your RV’s monitoring system to keep track of waste levels and avoid overfilling.
- Schedule Dumps Appropriately: Don’t wait until the tank is completely full. Dumping when the tank is between two-thirds and three-quarters full is ideal.
Travel Considerations
- Close Valves While Driving: Ensure all tank valves are closed to prevent spills or leaks on the road.
- Use RV-Safe Toilet Paper: This type of toilet paper dissolves more easily, reducing the risk of clogs.
Be A Better RV Dumper
Properly dumping your RV black tank is an essential skill for every RV owner. By understanding the system, using the right tools, and following safety precautions, you can manage your waste disposal efficiently and hygienically.
Regular maintenance and mindful practices not only enhance your travel experience but also contribute to environmental stewardship.
With this comprehensive guide, you’re well-equipped to handle your RV’s black tank like a pro, leaving you more time to enjoy the open road and the adventures that await.
We’ll Help You Find the Best Free Camping in the USA
You should give it a try!
As a matter of fact, these free campsites are yours to enjoy. Every time you pay federal taxes, you’re contributing to these lands.
Become a FREE CAMPING INSIDER and join the 100,000 campers who love to score the best site!
We’ll send you the 50 Best Free Campsites in the USA (one per state). Access the list by submitting your email below:
Before step 3: make sure all valves are in the closed position!
You mentioned in your dumping process that after flushing the tanks to be sure to treat the tanks after dumping. Just wondering what you do to treat your tanks after flushing them. Thanks for all the info!
I don’t know where people get the idea that they need a separate hose, there is a vacuum breaker between the water inlet and the sprayer. On top of that the piping goes above both the inlet and the sprayer so backwash won’t happen.
I have a question, sometimes when I unscrew my sewer cap. A tiny bit of “sludge leaks out before I have a chance to attach the slinky. What are some tips to prevent this from happening?
Most Walmarts sell black water treatment it comes in either liquid or you can buy pods the problem with pods is overtime the gelatin packaging on the pods deteriorate to where they break open and they just become a mess in your container we like to use the liquid in individual bottles it’s easier than buying a big bottle and measuring out so much each time.
The best way to alleviate this issue is push more water through the tank. What I do, dump the black water tank. Fill it back up to 2/3 to full. Dump again. Fill once more and dump again. It’s is nearly impossible to get it all out so some will more than likely find its way to the cap. One thing to remember this is not a septic tank. This is a cesspool. Microbial break down does not occur as one would think like a sewage system. By the time anything actually breaks down it will be time to dump under normal use. Only way to get rid of the smell is get rid of the poop!
What you are referring to is not “black water treatment”. It is however “Holding Tank Deodorant”. This chem is similar to what you will find in a porta-pottie. It does not treat or breakdown solids. It just kills the smell. Eventually the chem will be overcome with too much poo and pee that it will loose its effectiveness. When this happens, time to dump.
I put a secondary gate on then attach the slinky to that. That allows me to remove the cap and attach the slinky, then open the gate. I bought the gate from Amazon and attaches the same way as the slinky.
You mentioned sanitizing the RV dumping valves And area. How do you accomplish this task?
If you don’t want to install another gate valve then run your pipe in the sewer first then hold the pipe near your outlet and slowly uncap so any residue goes into your hose then screw on your hose
Wrong. Put hose in sewer dump first. Then bring hose to your discharge and slowly undo cap. Incase of residue. Then screw on your hose to continue.