If you want to transform a space, installing vinyl plank flooring is a great way to do it. You can bring new life to a room that has seen better days. However, paying someone else to do it can get expensive. Luckily, installing flooring is something that many DIY enthusiasts can handle.
Today, we’ll look at how to install vinyl plank flooring and whether it should become your next weekend project. Let’s get started.
What Is Vinyl Plank Flooring?
Vinyl plank flooring, also known as luxury vinyl plank or floor, uses narrow strips that join together to create a solid flooring surface. It typically uses multiple layers to make tough yet forgiving flooring.
Many of these resist scratches, scuffs, and tears. When installed correctly, these floorings can achieve the look and feel of wood or stone at a fraction of the cost.
Do You Put Anything Under Vinyl Plank Flooring?
You’ll hear conflicting reports about whether or not you need to put anything under vinyl plank flooring when installing it. This is because whether or not you need to use it depends on the type and the surface where you’ll install it.
If you put it on hardwood, embossed, cushioned, buckled, or uneven flooring, you’ll need some underlay. However, vinyl plank flooring can easily be placed over old linoleum and vinyl as long as it’s in good condition.
Does My Floor Have to Be Perfectly Level for Vinyl Plank Flooring?
If you want the best results, you need your floor as level as possible. However, getting it perfectly flat may not always be worthwhile.
Vinyl plank flooring is typically thicker, which makes it more forgiving when it comes to minor flaws in your subfloor. You should do your best to get the surface as level as possible, but don’t stress every tiny imperfection.
Do I Need a Moisture Barrier Under Vinyl Plank Flooring?
Whether or not you’ll need to install a moisture barrier under vinyl plank flooring will depend on where you put it and the subfloor surface.
You won’t need to worry about a moisture barrier when installing vinyl plank flooring over wood subfloors or existing tile or linoleum. However, using a moisture barrier helps if you install it in an area with high humidity and moisture.
Additionally, anytime you install vinyl planks over concrete, you’ll typically want to use a moisture barrier. Concrete is a very porous material that can create moisture as it changes temperatures.
This is why you should never store cardboard boxes on the ground in a garage; the moisture will seep into the bottom and cause issues over time.

How to Install Vinyl Plank Flooring
Installing vinyl plank flooring is a project that just about any DIYer can tackle with the right tools and a little time. However, it’s a project you want to do right the first time to ensure you get a polished and professional look.
Let’s look at what you need to do when installing your flooring.
Prepping the Floor
First, prepare the floor. Remove any furniture or appliances in the way when laying the flooring. You’ll need to go around the room and remove the quarter-round trim and potentially the baseboards when necessary.
If removing the existing flooring, ensure the surface is relatively smooth to avoid any leveling issues. And remove any nails or staples sticking up from the floor.
Prepare Your Planks
Before you go installing the vinyl, come up with a plan. Set your vinyl flooring to prevent a short board at the beginning or end of a row or an overly narrow row at the end of your installation. You can draw the space and plan the layout of your planks accordingly.
Once you’re ready to begin, start your rows off straight. It’s not uncommon for walls to be uneven, so you’ll need to account for this in the first cut.
Run a chalk line on the floor near the base of a wall and measure the distances throughout the line. Cut the first prow with a table saw to start the flooring off straight.
Additionally, manufacturers only use so many patterns when designing flooring pieces. As a result, you want to mix up the flooring pieces into various piles to help ensure you get a random look in the end.
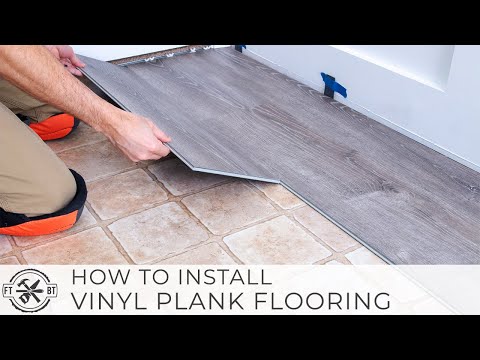
Installing the Vinyl
Once you place the first piece, the rest begin to snap together. You can use a tapping block and rubber mallet to secure each plank together. Continue until you reach the end of the row and must use a partial board to finish.
First, measure the distance and cut a partial piece of vinyl plank flooring to fit. You’ll need to account for the reduced width to ensure everything stays straight.
Then when you move to the second row, you’ll cut the first piece to 18 inches and lock it into place with a tapping block.
Continue working down the second row until you reach the stopping point, where you’ll need to cut another piece to fit.
Depending on the size of the cut you need to make, you can use a razor blade. However, use a table or circular saw if you only need a larger section.
It’s also important to remember that you can use some of the smaller pieces that you’ve cut off to fill in the spaces at the end. You don’t need to use a brand-new sheet every time, especially if the extra pieces are long enough to finish the row.
Continue this process until you cover the entire flooring in the room. Then when finished, install the quarter-round around the edges to hide the seams, and you’ll have a beautiful new floor in your space.
Tools Needed
You’ll need to gather some tools to install vinyl plank flooring yourself. First, you’ll need a tape measure, calculator, pencil, and bevel tool to start planning your flooring.
Take your time measuring and calculating the number of boxes of flooring you’ll need for the project. You don’t want to buy too much or not order enough. This can really delay your project and increase the cost.
Next, you’ll need a razor blade, a hacksaw or table saw, a mallet, and a tapping block. You can purchase a flooring installation kit that provides everything you need except the power tools.
You can use a hacksaw or box cutter to help cut your flooring to fit snugly against cabinets and other uneven corners in your room.
Always err on the side of cutting too little instead of too much. You don’t want to make a costly mistake by taking too much off a flooring piece.
Is It Better to Glue or Float Vinyl Plank Flooring?
Both glue and floating vinyl plank floors work great. However, floating plank is easier to install and more forgiving with subfloors.
Most DIYers can install it themselves and save money. However, if you want a more authentic-sounding floor, then you’ll want to go with glue flooring.
How Long Will Vinyl Planks Last?
One of the benefits of vinyl plank floors is that they are incredibly durable. When installed and maintained correctly, you can expect the flooring to last upward of 10 to 20 years. This makes them an excellent choice in high-traffic areas.
Vinyl plank also works great for families as they resist scratches and stains. If you have young kids or pets, you can trust them to hold up well to whatever life throws at them.
Are you ready to install your flooring?
We’ll Help You Find the Best Free Camping in the USA
You should give it a try!
As a matter of fact, these free campsites are yours to enjoy. Every time you pay federal taxes, you’re contributing to these lands.
Become a FREE CAMPING INSIDER and join the 100,000 campers who love to score the best site!
We’ll send you the 50 Best Free Campsites in the USA (one per state). Access the list by submitting your email below: