Do You Need to Winterize Your Camper?
Depending on where you live and your RV lifestyle, you may need to winterize your camper.
In a large portion of the country, the changing leaves signify that it’s almost the end of the camping season. And, preparing your camper for a long winter’s nap is key to ensuring it’s ready to go next camping season.
Let’s see whether you’ll need to add this task to your to-do list.
What Does Winterize Mean?
When you winterize your camper, you prepare it to handle the cold temperatures and sit in storage. This typically includes emptying your entire plumbing system and performing any annual maintenance.
This protects the sensitive components from damage due to the changes in temperature and extreme winter conditions.
Consult your RV’s documentation to ensure you don’t overlook any areas during this process. Being in a hurry while winterizing your RV can be a costly mistake.
Skipping a step can result in damage to your RV, which is not how you want to start your next camping season.
Do I Need to Winterize My Camper if It Never Freezes Where I Live?
If you live in an area where freezing temperatures aren’t a major concern, you may not need to winterize your camper fully. During winter, the biggest concern is the freezing temperatures causing water in your water lines to expand and cause damage.
However, the changing of the seasons is a good time for annual maintenance.
You’ll want to empty and flush out your freshwater and wastewater tanks.
At What Temperatures Do Pipes Freeze in a Camper?
Water freezes at below 32 degrees Fahrenheit. However, it typically isn’t a problem for RVs unless it’s below freezing for 24 hours or more. This is because many of the pipes and water lines in your RV are insulated and protected from the elements.
Some RVs have more insulation than others and can withstand colder temperatures.
Keep in mind that wind chill can play a part in your pipes freezing too. The cold air can cause temperatures to drop in storage bays and pipes to freeze quickly. Don’t put off winterizing your RV until you have no other choice.
Do it early so you can stay warm and cozy when those freezing temperatures hit.
Pro Tip: Keep cozy in the cold with these 5 Ways to Heat Your RV This Winter.
What’s Required in Winterizing a Camper?
When winterizing your RV, get every bit of water out of your water lines and plumbing system. This includes the water heater, freshwater tank, and any wastewater tanks. Any water in your RV’s plumbing system will freeze when exposed to extended periods of sub-freezing temperatures.
Also, take this opportunity to do routine maintenance on your RV.
This includes checking the roof for any cracking in the sealant, inspecting exterior seals for damage, and giving the whole RV a good cleaning.
Preparing your RV for winter will vary depending on where you live. If you live in an area with harsh winter conditions, you’ll want to do more than if you’re in a mild climate. However, freezing temperatures can happen practically anywhere in the country.
So make sure you read through the documentation that came with your RV for any special processes unique to your RV.

Products You Need to Winterize Your Camper
Do yourself a favor and gather all of the supplies you’ll need to winterize your RV before starting the job. This will help ensure you’re efficient with your time and that you can get the job done as quickly as possible.
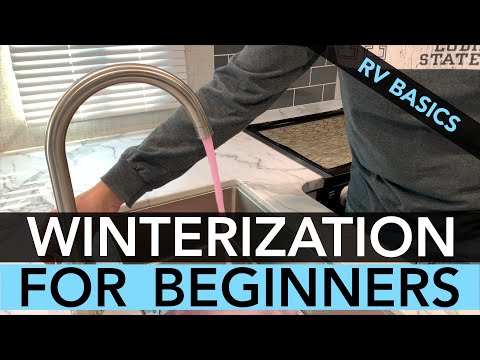
To winterize your water lines, you’re going to need a few gallons of RV antifreeze, a drinking water hose, and a way to siphon it into your water system. If your RV doesn’t have a siphon function, you’ll either need a conversion kit or an external water pump.
Pick up some roof and exterior sealant to prevent any leaks causing water damage in your RV. You can also pick up some roof cleaner to clean your RV’s roof before putting it in storage.
Give your entire RV a good cleaning and clear out all of the food you’re storing. Any food left in your RV will attract rodents. You can also double down by purchasing rodent repellent.
Keep out moisture as well. You can place a product like Damp Rid in various places throughout your RV to help protect it from moisture, which can cause mold.
How to Winterize a Camper
The first thing to do when winterizing your RV is empty all of your freshwater and wastewater tanks and give them all a good flushing. You can then drain and flush your water heater and open your low point drains.
The goal is to get every bit of water out of your RV’s water system.
From there, you can begin siphoning antifreeze into your water lines. Make sure you have your settings configured to bypass the water heater. It’s not necessary to fill it with antifreeze. Connect a siphoning hose to your RV’s water system and put the other end into the antifreeze.
Then go around and open one faucet at a time until you see the pink liquid come through. Once you see the liquid, shut off the faucet and move to the next faucet. Do this on both the hot and cold sides of the faucet.
Don’t forget to do all showers, toilets, and outside sinks or showers, too. Finish by pouring some antifreeze down the drains to fill the P-traps.
Once you’ve winterized your water system, you can winterize the rest of the RV. This is a great time to give your RV a good cleaning, inside and out. Remove any food or other items that might attract rodents or insects. If you want to install repellents or traps, this is the time to do it.
Finally, make sure you do any annual maintenance on your RV. It’s a good idea to winterize your RV before it gets too cold to give both the inside and outside the attention they deserve.
You don’t want to rush through this process because the weather’s not cooperating or you’re cold.
Pro Tip: Want to skip the cold and snow all together? Find out Where Do RVers Spend The Winter?
Do You Have to Winterize if You Live in Your Camper Full-Time?
If you’re living in your camper full-time, you’ll likely not need to winterize completely.
This is especially true if your RV has a four-season rating. RVs with a four-season rating typically have better insulation, heat pumped into the under-storage compartments, and the ability to handle colder temperatures.
If you’re living in your RV, you’ll likely be running the heat in your RV, and it will be less susceptible to colder temperatures.

Winterizing Protects Your Camper and Keeps it Ready for Next Camping Season
Don’t start your camping season off by discovering damage to your RV because you didn’t winterize it properly. Take your time and do your due diligence while winterizing your RV so it’s ready to go next camping season.
This ensures your RV lasts not just for the next camping season but many more camping seasons to come.
Do you winterize your RV yourself or hire someone to do it?
Discover the Best Free Camping Across the USA
To be honest with you, we hate paying for camping. There are so many free campsites in America (with complete privacy).
You should give it a try!
As a matter of fact, these free campsites are yours. Every time you pay federal taxes, you’re contributing to these lands.
Become a FREE CAMPING INSIDER and join the 100,000 campers that love to score the best site!
We’ll send you the 50 Best Free Campsites in the USA (one per state). Access the list by submitting your email below: