A 1979 Airstream Argosy renovation seemed like a dream project when we first dove in—a chance to combine classic charm with modern comforts.
But, what started as an exciting renovation quickly turned into a year-and-a-half-long saga of unexpected challenges, late nights, and a whole lot of learning on the fly.
From hidden water damage to sourcing parts that haven’t been made in decades, we encountered just about every hurdle imaginable. Still, that unmistakable vintage vibe kept us motivated to see the project through, even when it felt like we’d never finish.
Here’s how we tackled the obstacles, one rivet at a time.

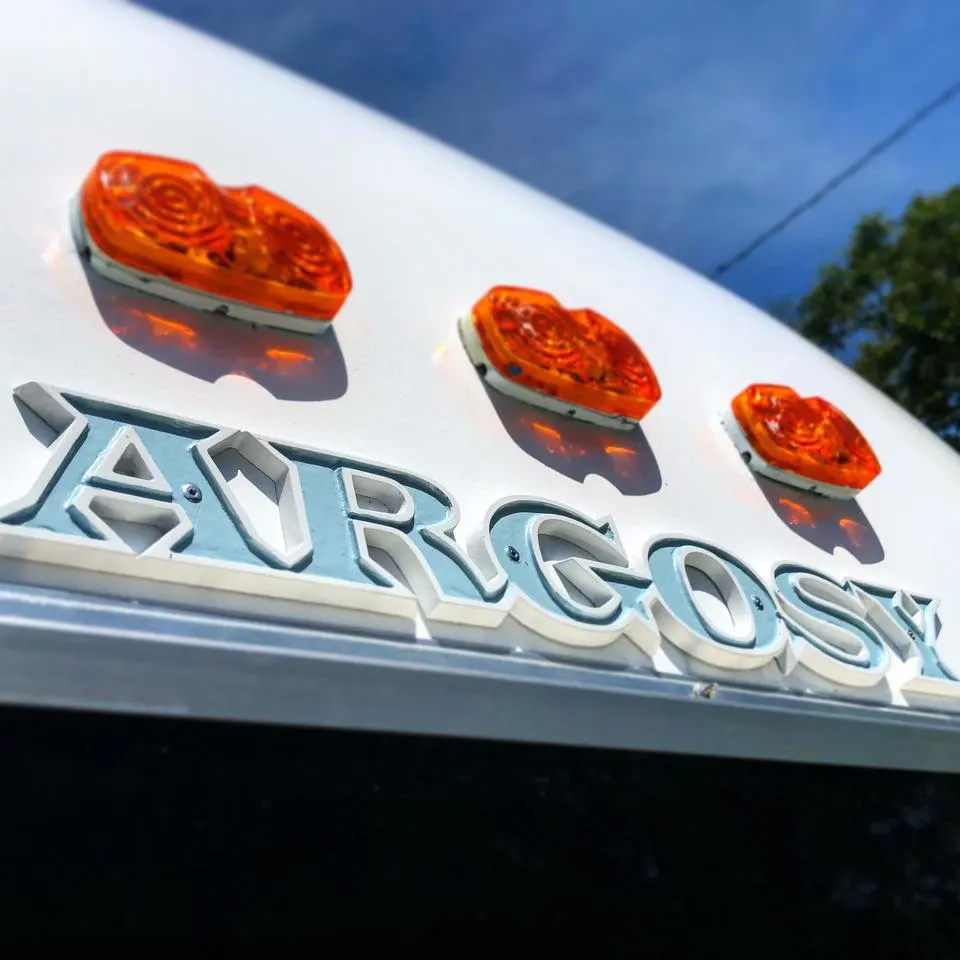
We Renovated a 1979 Airstream Argosy
We are so happy to share our 1979 Airstream Argosy Reveal! Our renovation is complete after a very long year and a half process. It was so much more challenging and rewarding than we could have ever imagined.
Sometimes, we pushed our physical and emotional limits to the brink, questioned our sanity, and almost lost hope of ever reaching the finish line.
BUT… we never gave up, and we kept pushing forward one day at a time, and now we have a home that we can be proud of, and that will take us on many adventures. It’s going to facilitate so many beautiful experiences and journeys with our daughter, and it makes every single minute of work worthwhile.
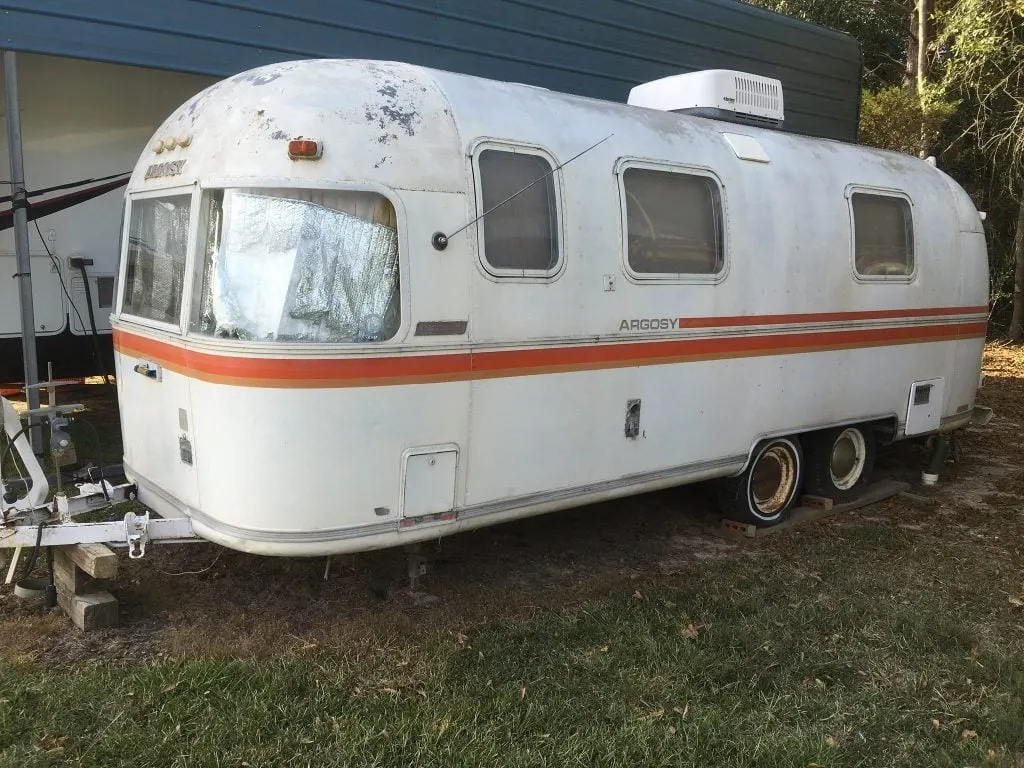
Airstream Argosy Renovation: Before It Began
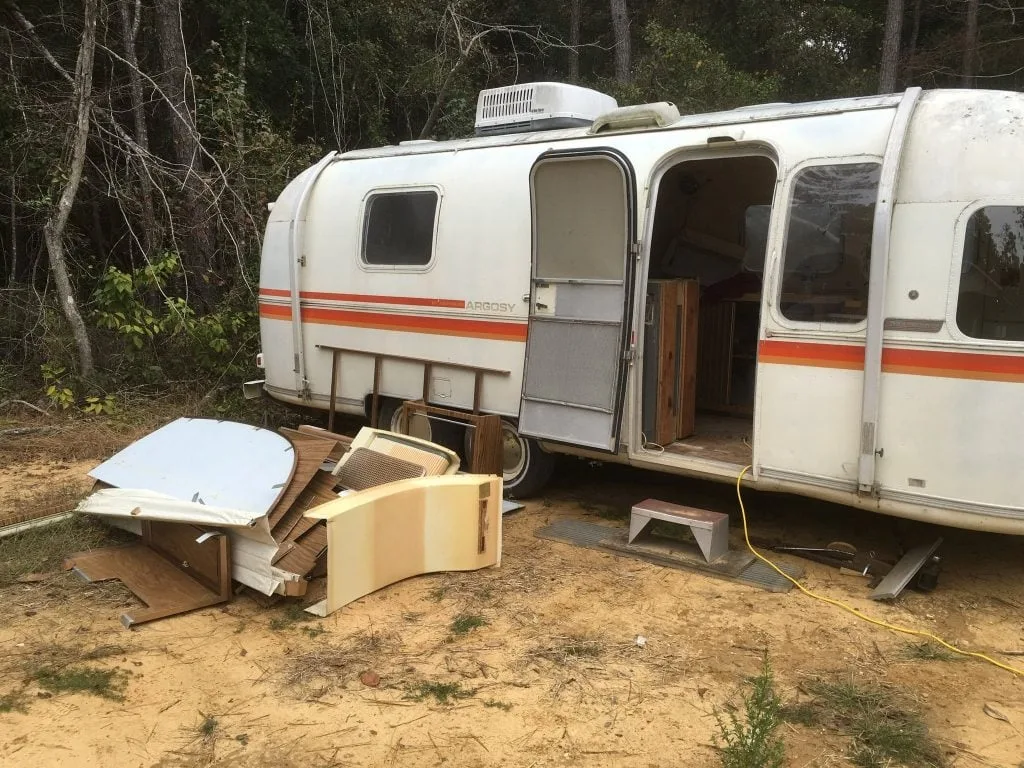
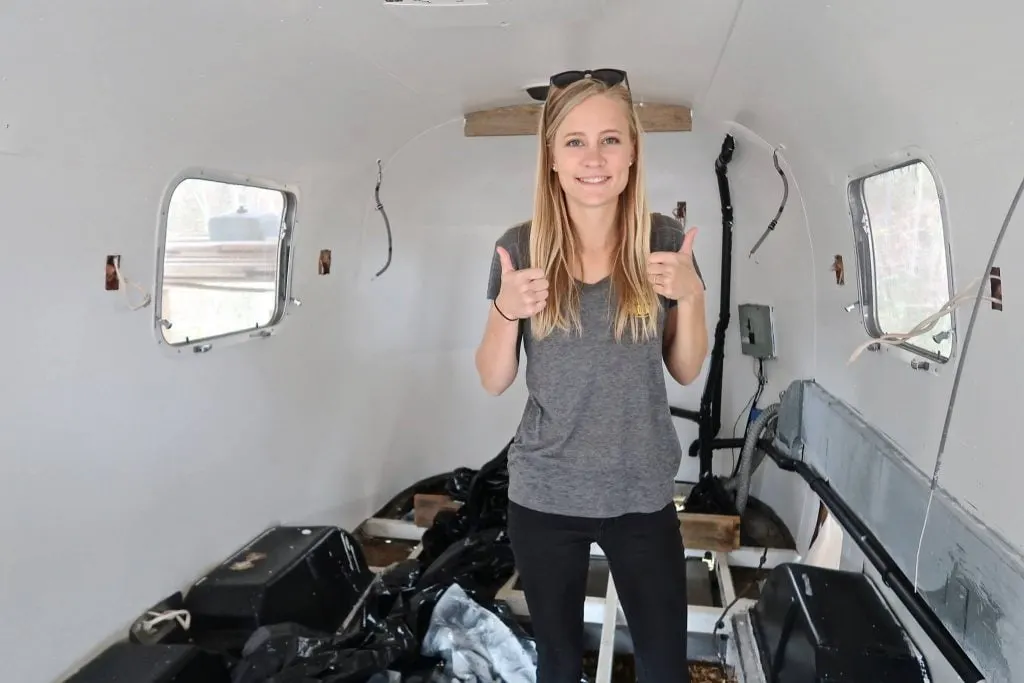
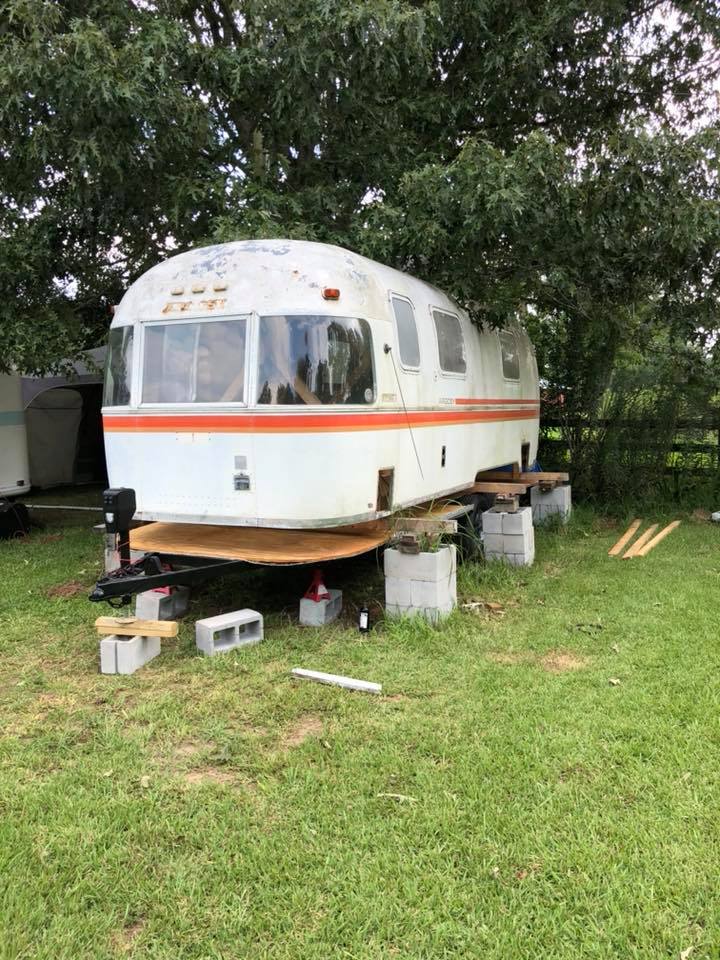
If you remember, way back when we made this crazy decision, we bought the Airstream Argosy sight unseen from a friend back in our hometown. We knew it had been completely gutted and would be a complete rebuild.
It was an empty shell, not even a subfloor left. We looked at it and thought, perfect! We will make it completely custom to our needs. Oh, to be naive and full of grand ideas and energy…


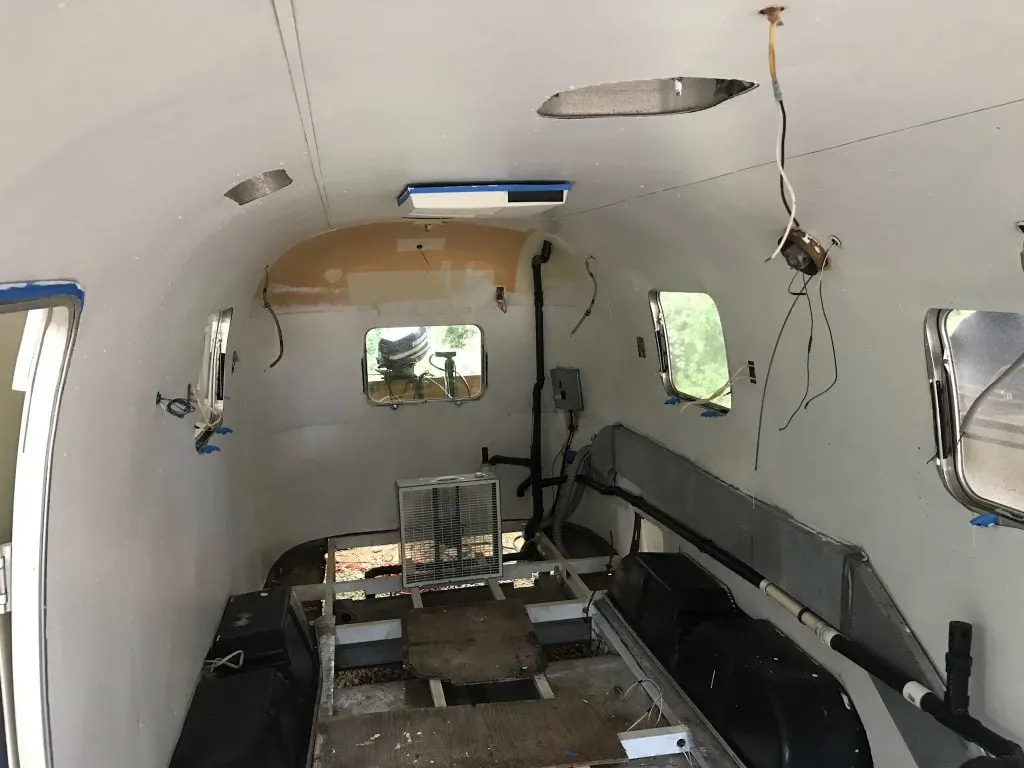
The project quickly became more extensive than we even imagined when we decided to go for “The Full Monty” a complete shell off renovation.
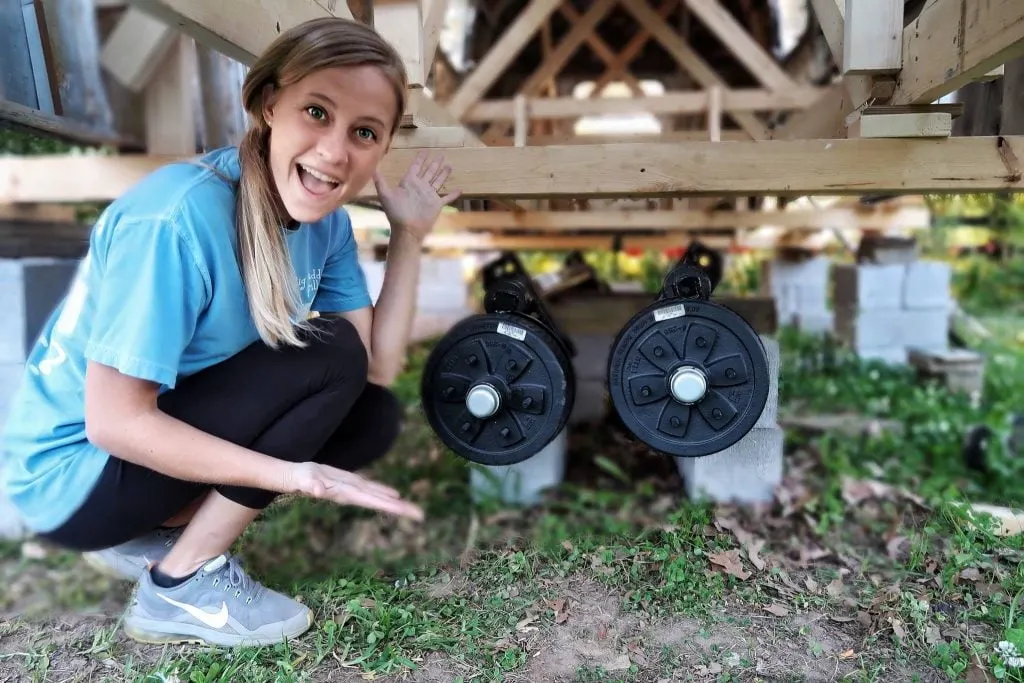
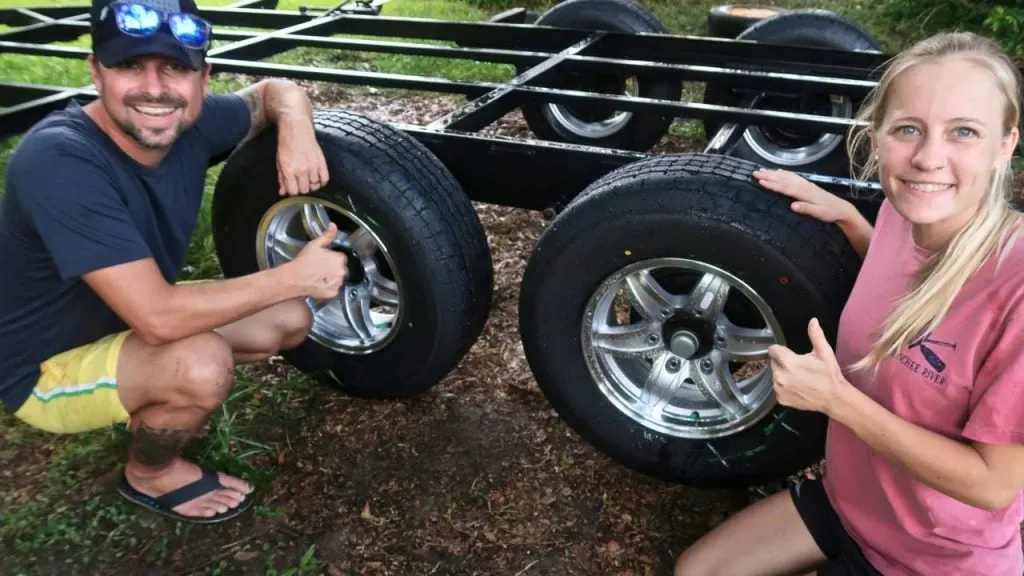
We realized to properly access the frame to repair and re-weld and to more easily install the subfloor we would need to take the shell off. It allowed us to sand blast the frame, weld on added support, repair rusted areas, add a 4 inch lift and install our new axles from Inland RV.
We also coated the frame with some great rust preventative chassis paint from Eastwood Automotive.


Lifting Shell Off Frame
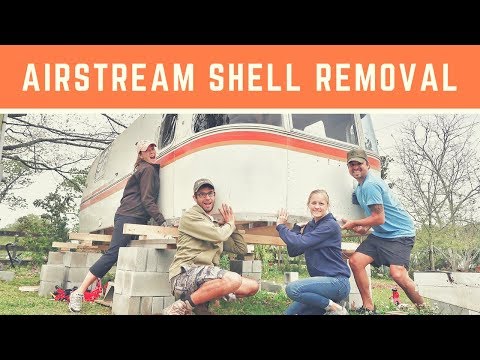
Time to get the full monty underway! From our research, there are two ways to perform the shell removal: build an inner frame and jack the shell up or build a large pulley system and lift the shell off.
We decided to go with the first option. Fortunately, we had our friends, Mortons on the Move, to help us with this step.
Constructing an inner wooden frame is VERY important. This will prevent the aluminum shell from warping and bending out of shape. It also gives us an excellent structure to stabilize the frame once lifted.
The day after we built the wooden structure, we carefully and slowly jacked the shell off the frame. Once the frame was lifted, we positioned 4×4 beams on cinder block columns to keep the shell in position.
For the project, the high quality drill came in handy. Also, lots of heavy duty jacks and jack stands!
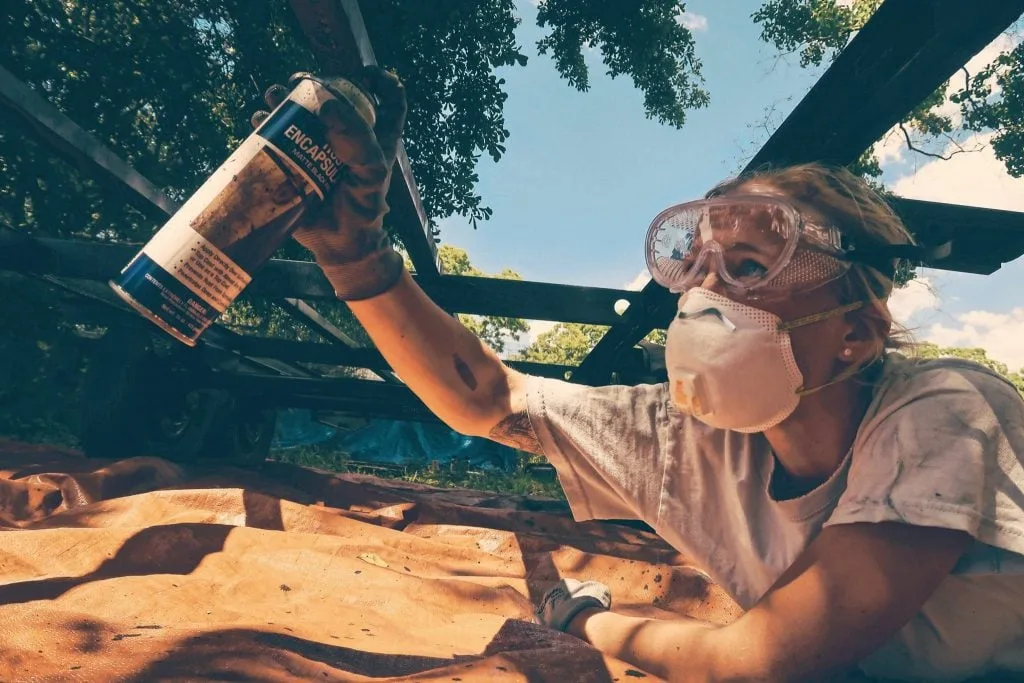
Total Frame Overhaul
Pulling the frame out from underneath the shell was eye opening! We spotted a few areas of rust that concerned us.
But, to get a full scope of potential rust damage, we decided to get the entire frame sandblasted.
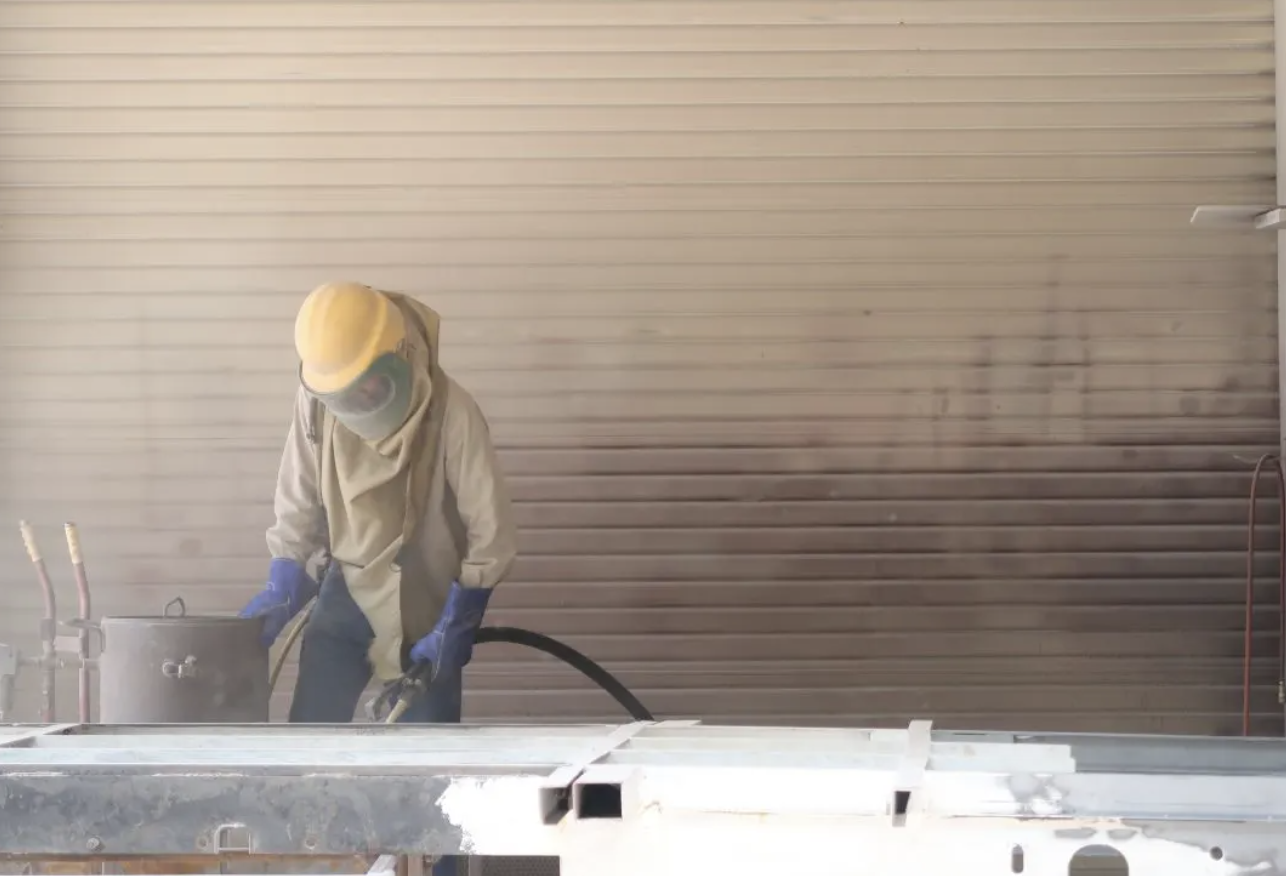
After sandblasting, we rebuilt areas that had too much rust, and we reinforced other spots just for good measure.
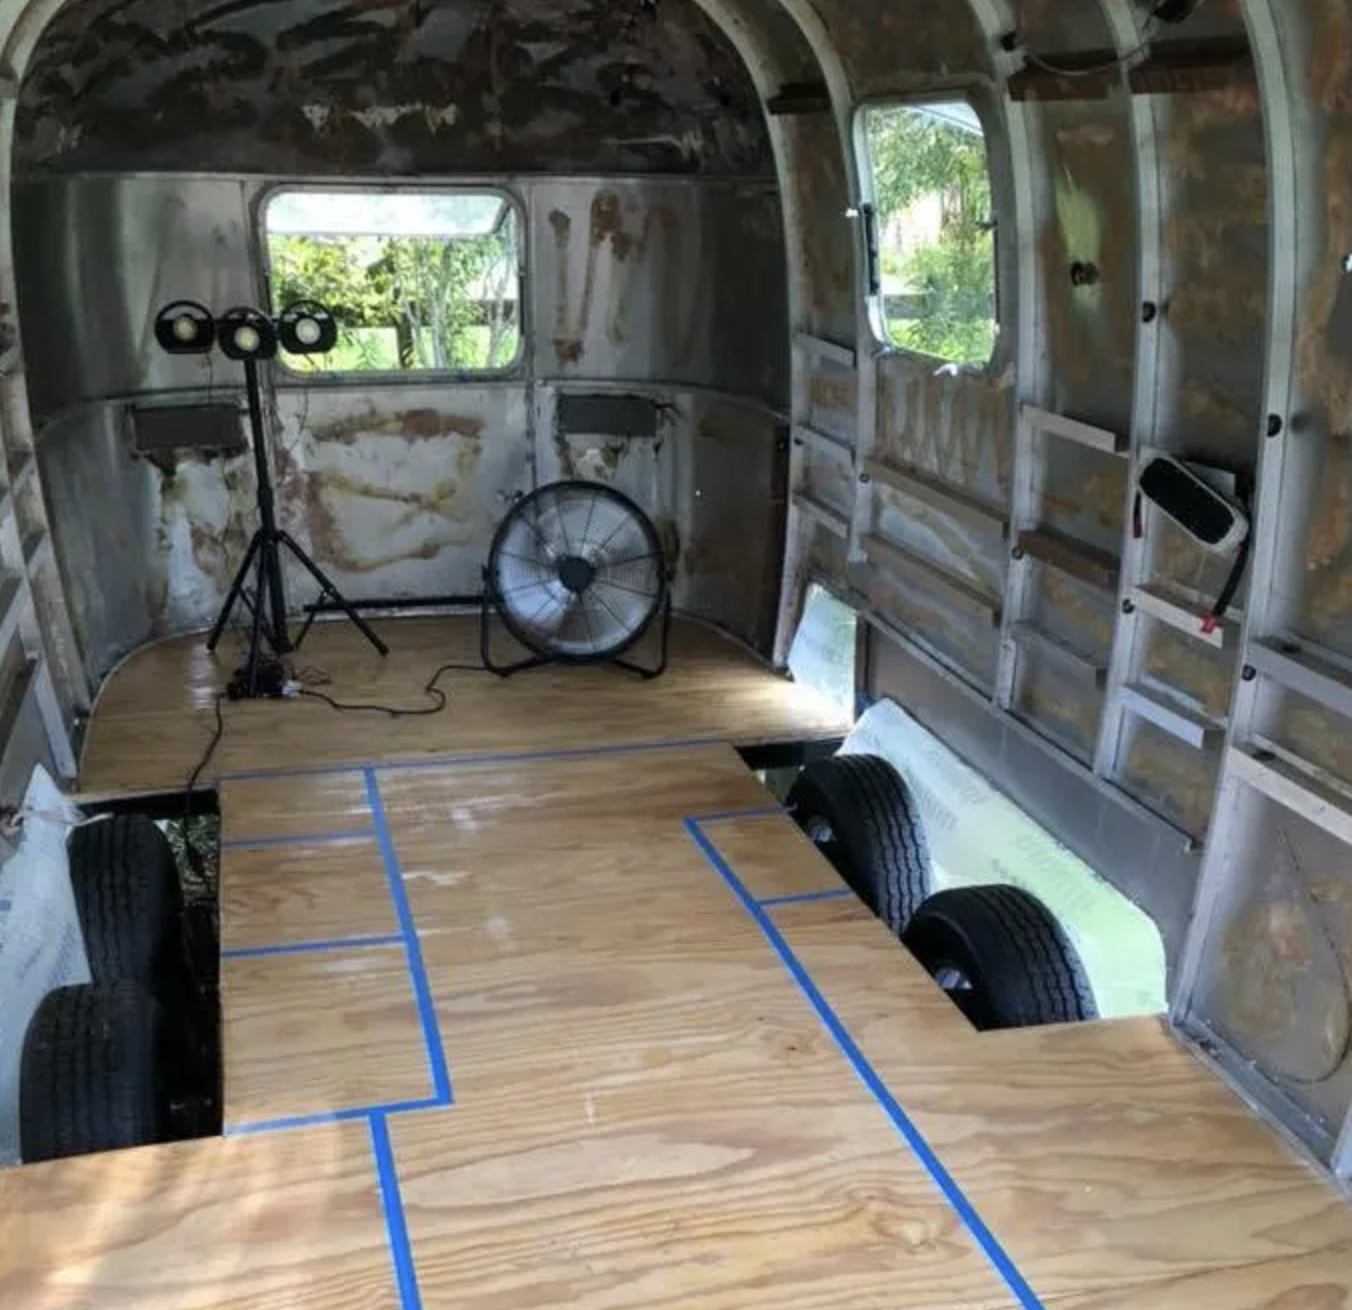
Building the Subfloor
This was the most daunting process so far…mostly because we had no template to start from. We had to use the inside shell to get an approximate measurement, and EVERY time we took the measurements, the numbers came back different. However, the differences were all within 1/2 an inch.
We also had to trace the curves and hope it was correct.
All of this may seem easy and like a no-brainer solution, but let me tell you, the aluminum at the bottom of the shell was anything but perfect. The aluminum had about half an inch of natural flex and was wavy due to riveting (none of this will be noticeable once the renovation is complete, but it made the template far from perfect).
Once we got the measurements and cut the subfloor pieces, we also cut reflectix insulation to adhere to the bottom of the subfloor plywood.
Airstream Argosy Renovations: The Final Results
The final product – a brand new travel trailer with a vintage body. The only original pieces are the aluminum skins and the fresh water tank.
It has a fresh bright white paint job using a single stage urethane from Eastwood Automotive with a shiny polished aluminum stripe to replace the orange and red vinyl.
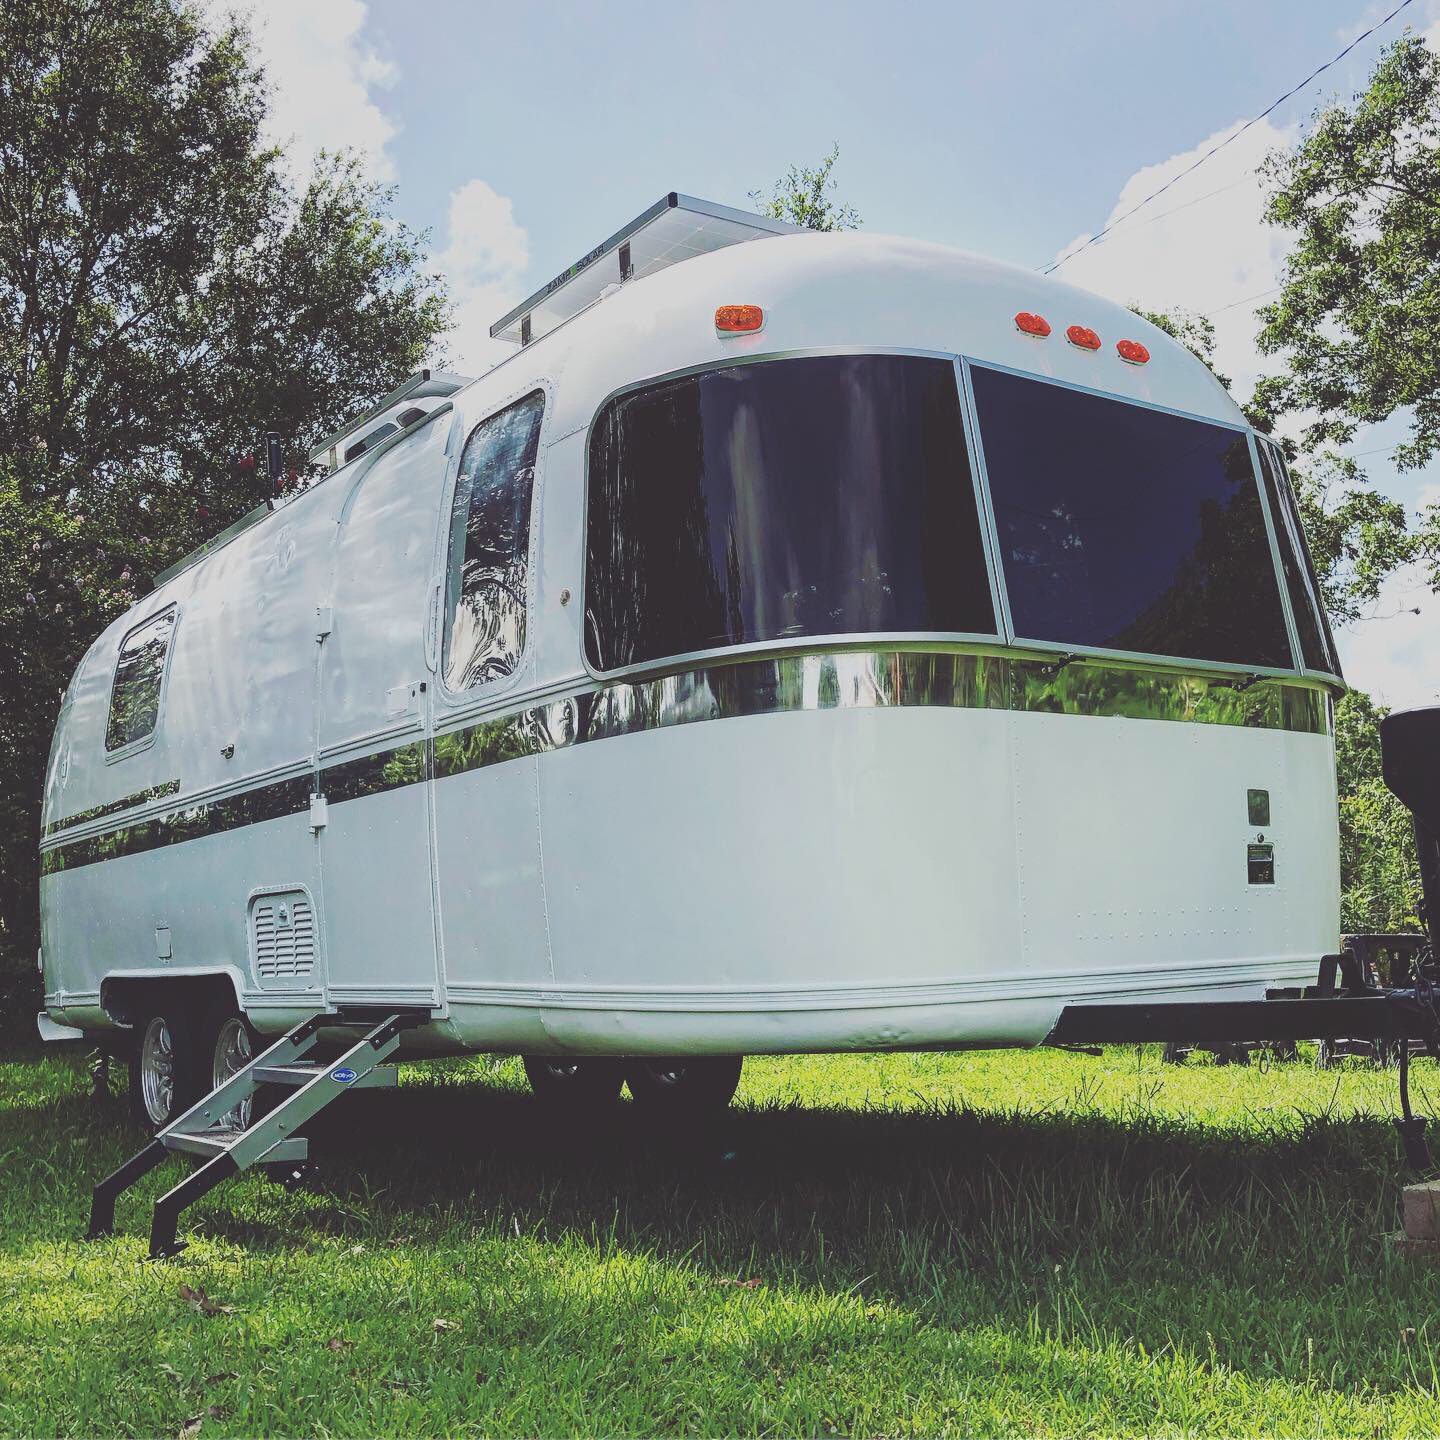

We liked keeping the vintage aesthetic of the classic Airstream Argosy while adding a little flash of silver as a nod to the traditional Airstream.
We used a few different grits of the Nuvite NuShine aluminum polish from Vintage Trailer Supply and it worked great. Vintage Trailer Supply was a great resource for our lights, window hardware and other vintage airstream parts.
It’s rocking some new sunglasses from Inland RV, these are the standard rock guards for airstreams with the panorama windows, but with a modification to the center panel to fit our narrower minuet model Airstream Argosy.
We’re super grateful to Inland RV for taking the time to make that modification for us and figuring it all out so we could focus on other projects. It was a huge help in meeting our deadline.
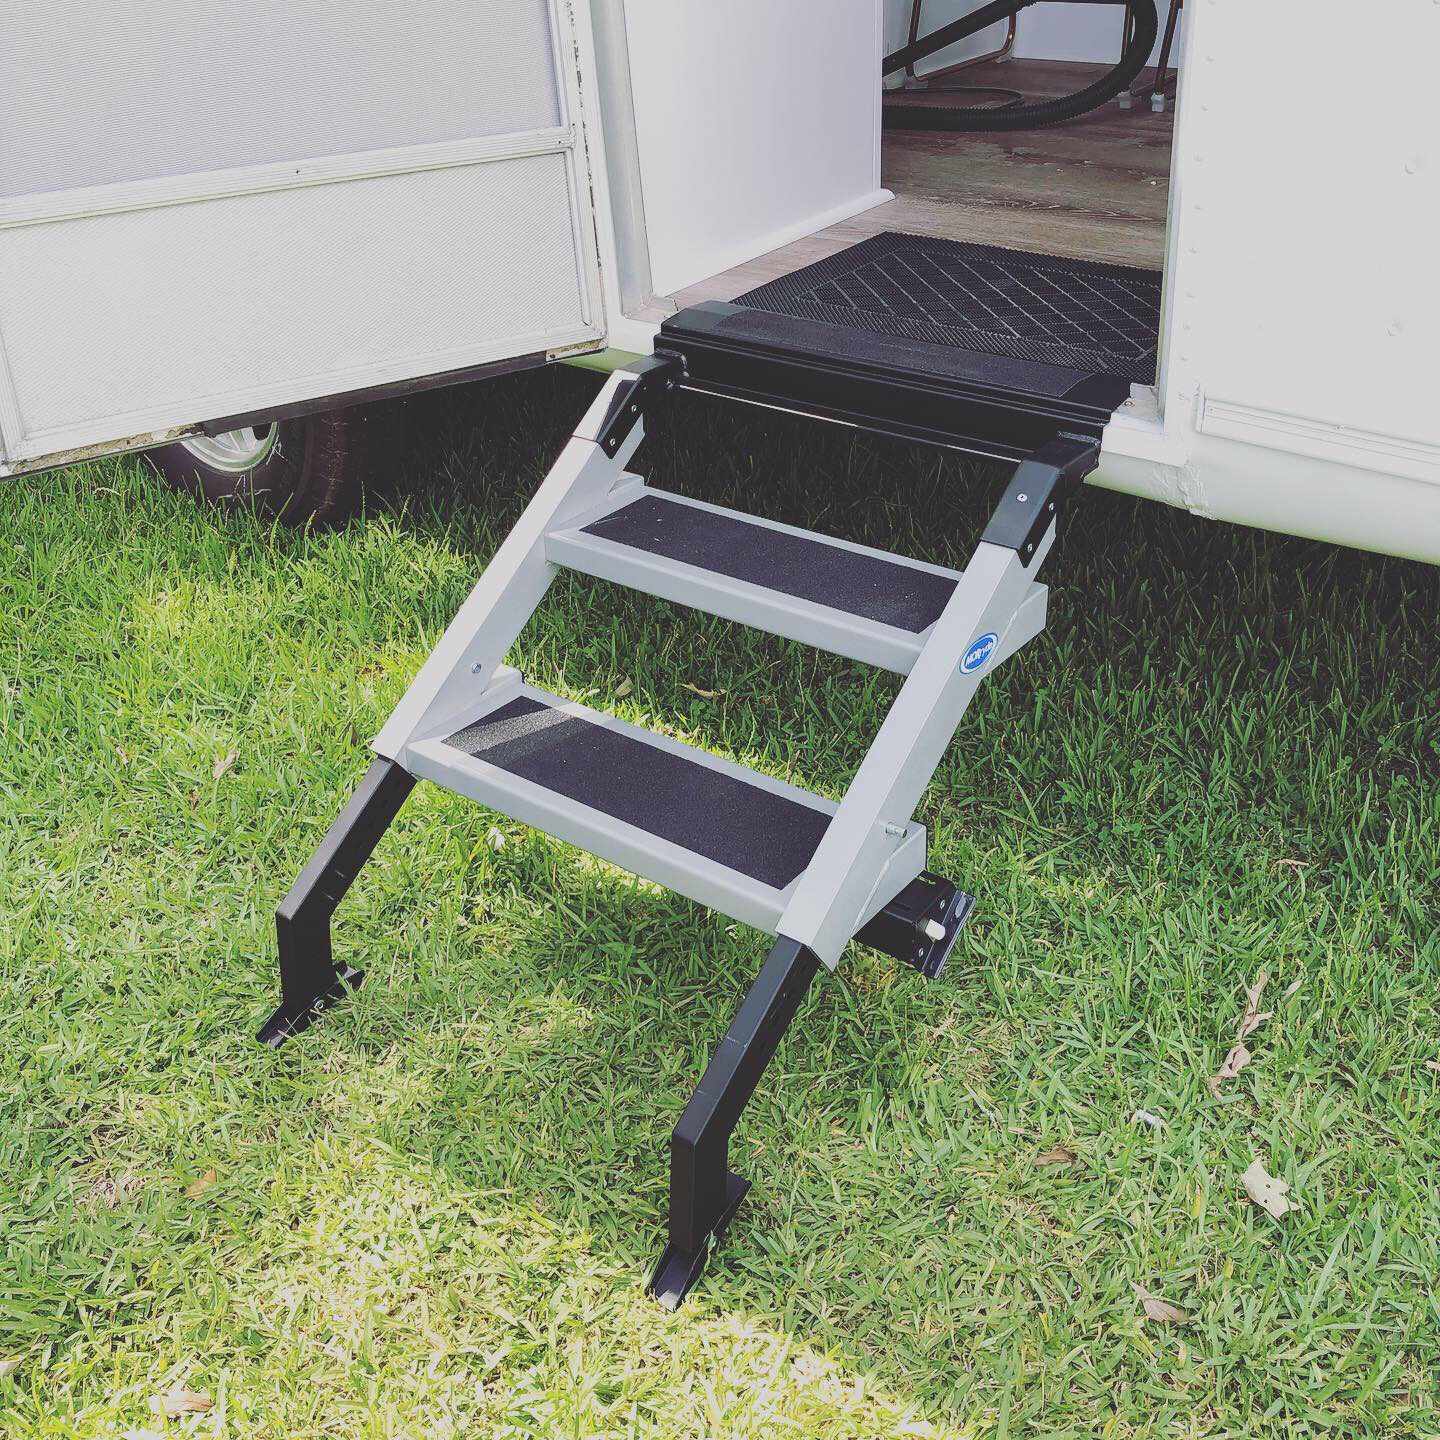
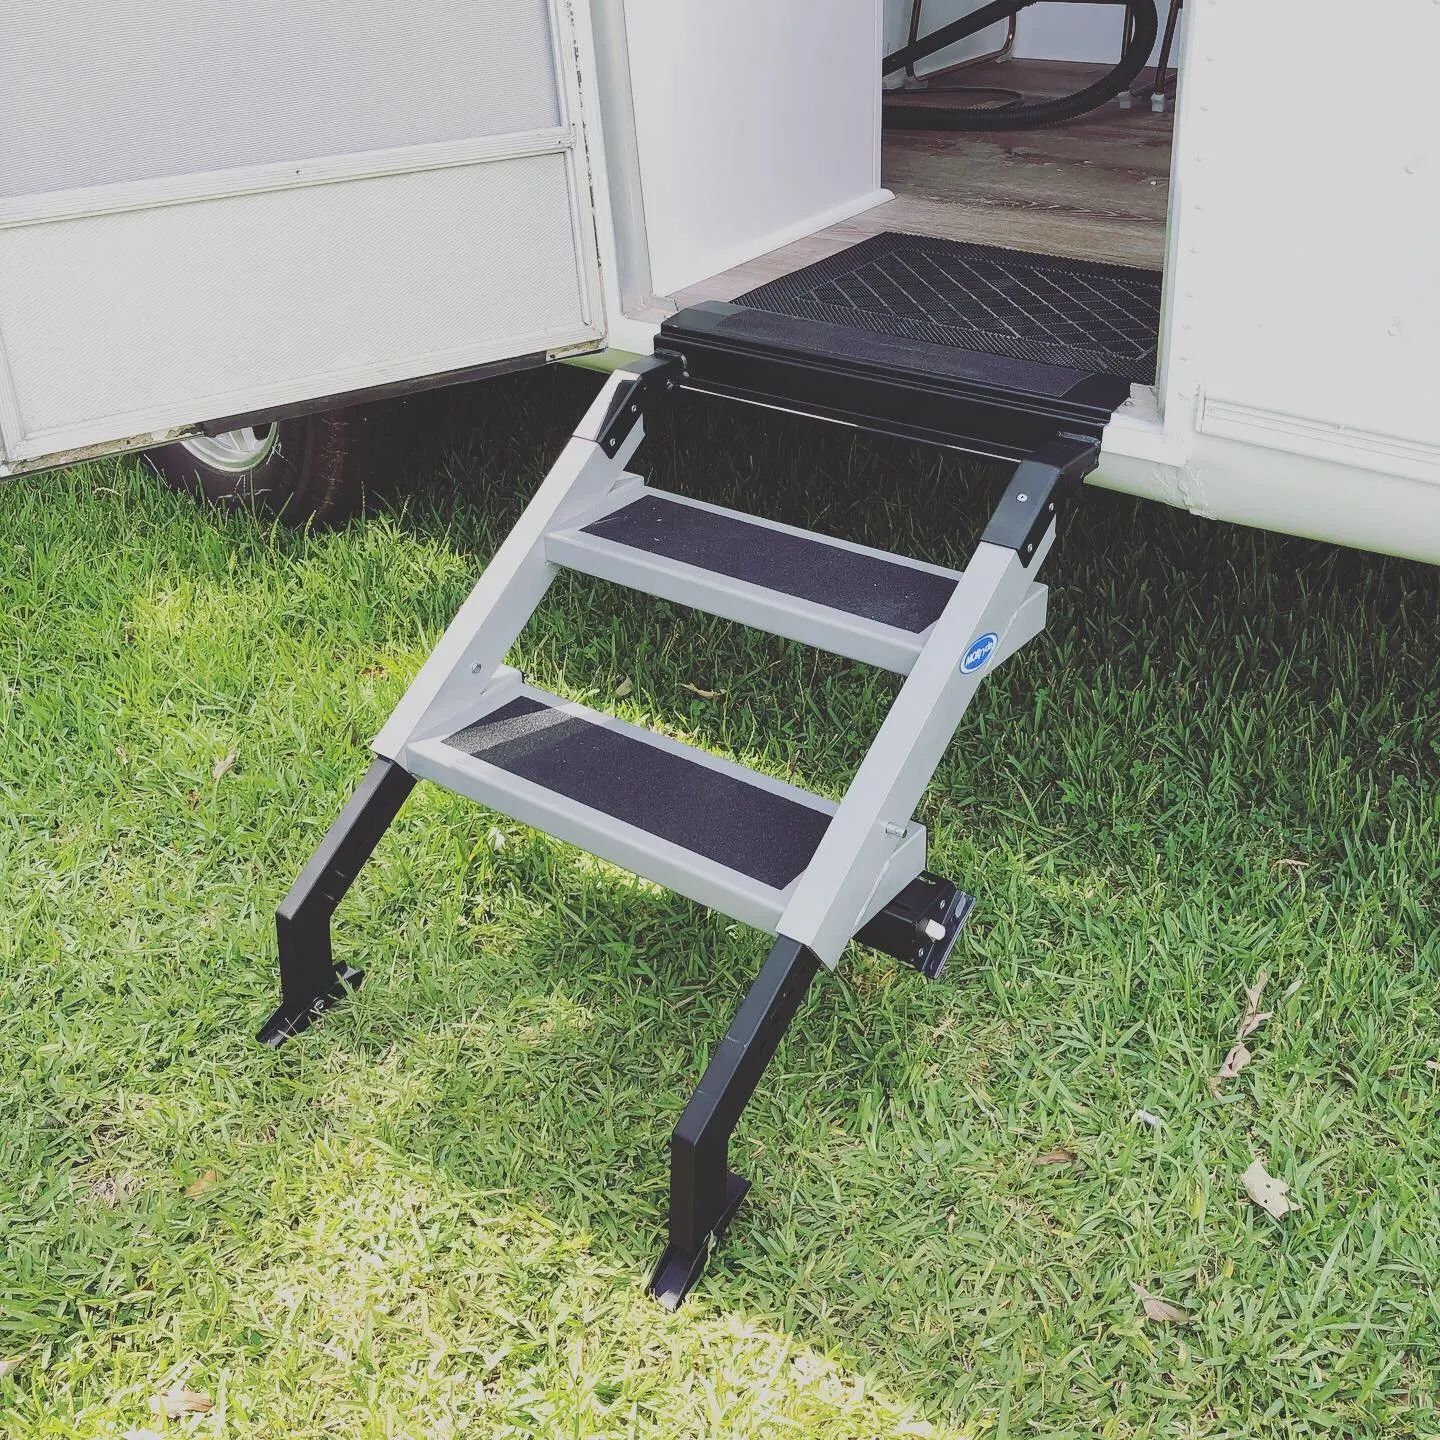
We also upgraded our factory-issued Argosy step stool to some super sturdy MorRyde steps! We loved our friends when we visited their 5th wheel but had never heard of anyone using them on an airstream or travel trailer.
We decided we couldn’t live without them, and we should ask if there’s any way to make them work with our rig, and the answer was YES! Thankfully, they had already experimented with some airstream steps and were able to send us the modified steps quickly.
If you want some of your very own, you can contact them directly. I don’t think they are listed for sale on their website yet.
New Appliances for our Airstream Argosy Renovation
We didn’t keep any original appliances and decided to nix the furnace altogether. Instead we got the super low profile Penguin II AC from Dometic which has a heat pump built in.
We also got their Atwood 6 gal propane/electric hot water heater and the Atwood 3 burner propane range/oven. We also replaced our old roof vents with two of the infamous fantastic vents.
We really wanted a 12V fridge, but couldn’t find one in the dimensions we needed, so we went with an affordable mini fridge from Home Depot in the meantime. Our new lithium battery system is so much more robust now, that this little fridge draws practically nothing.
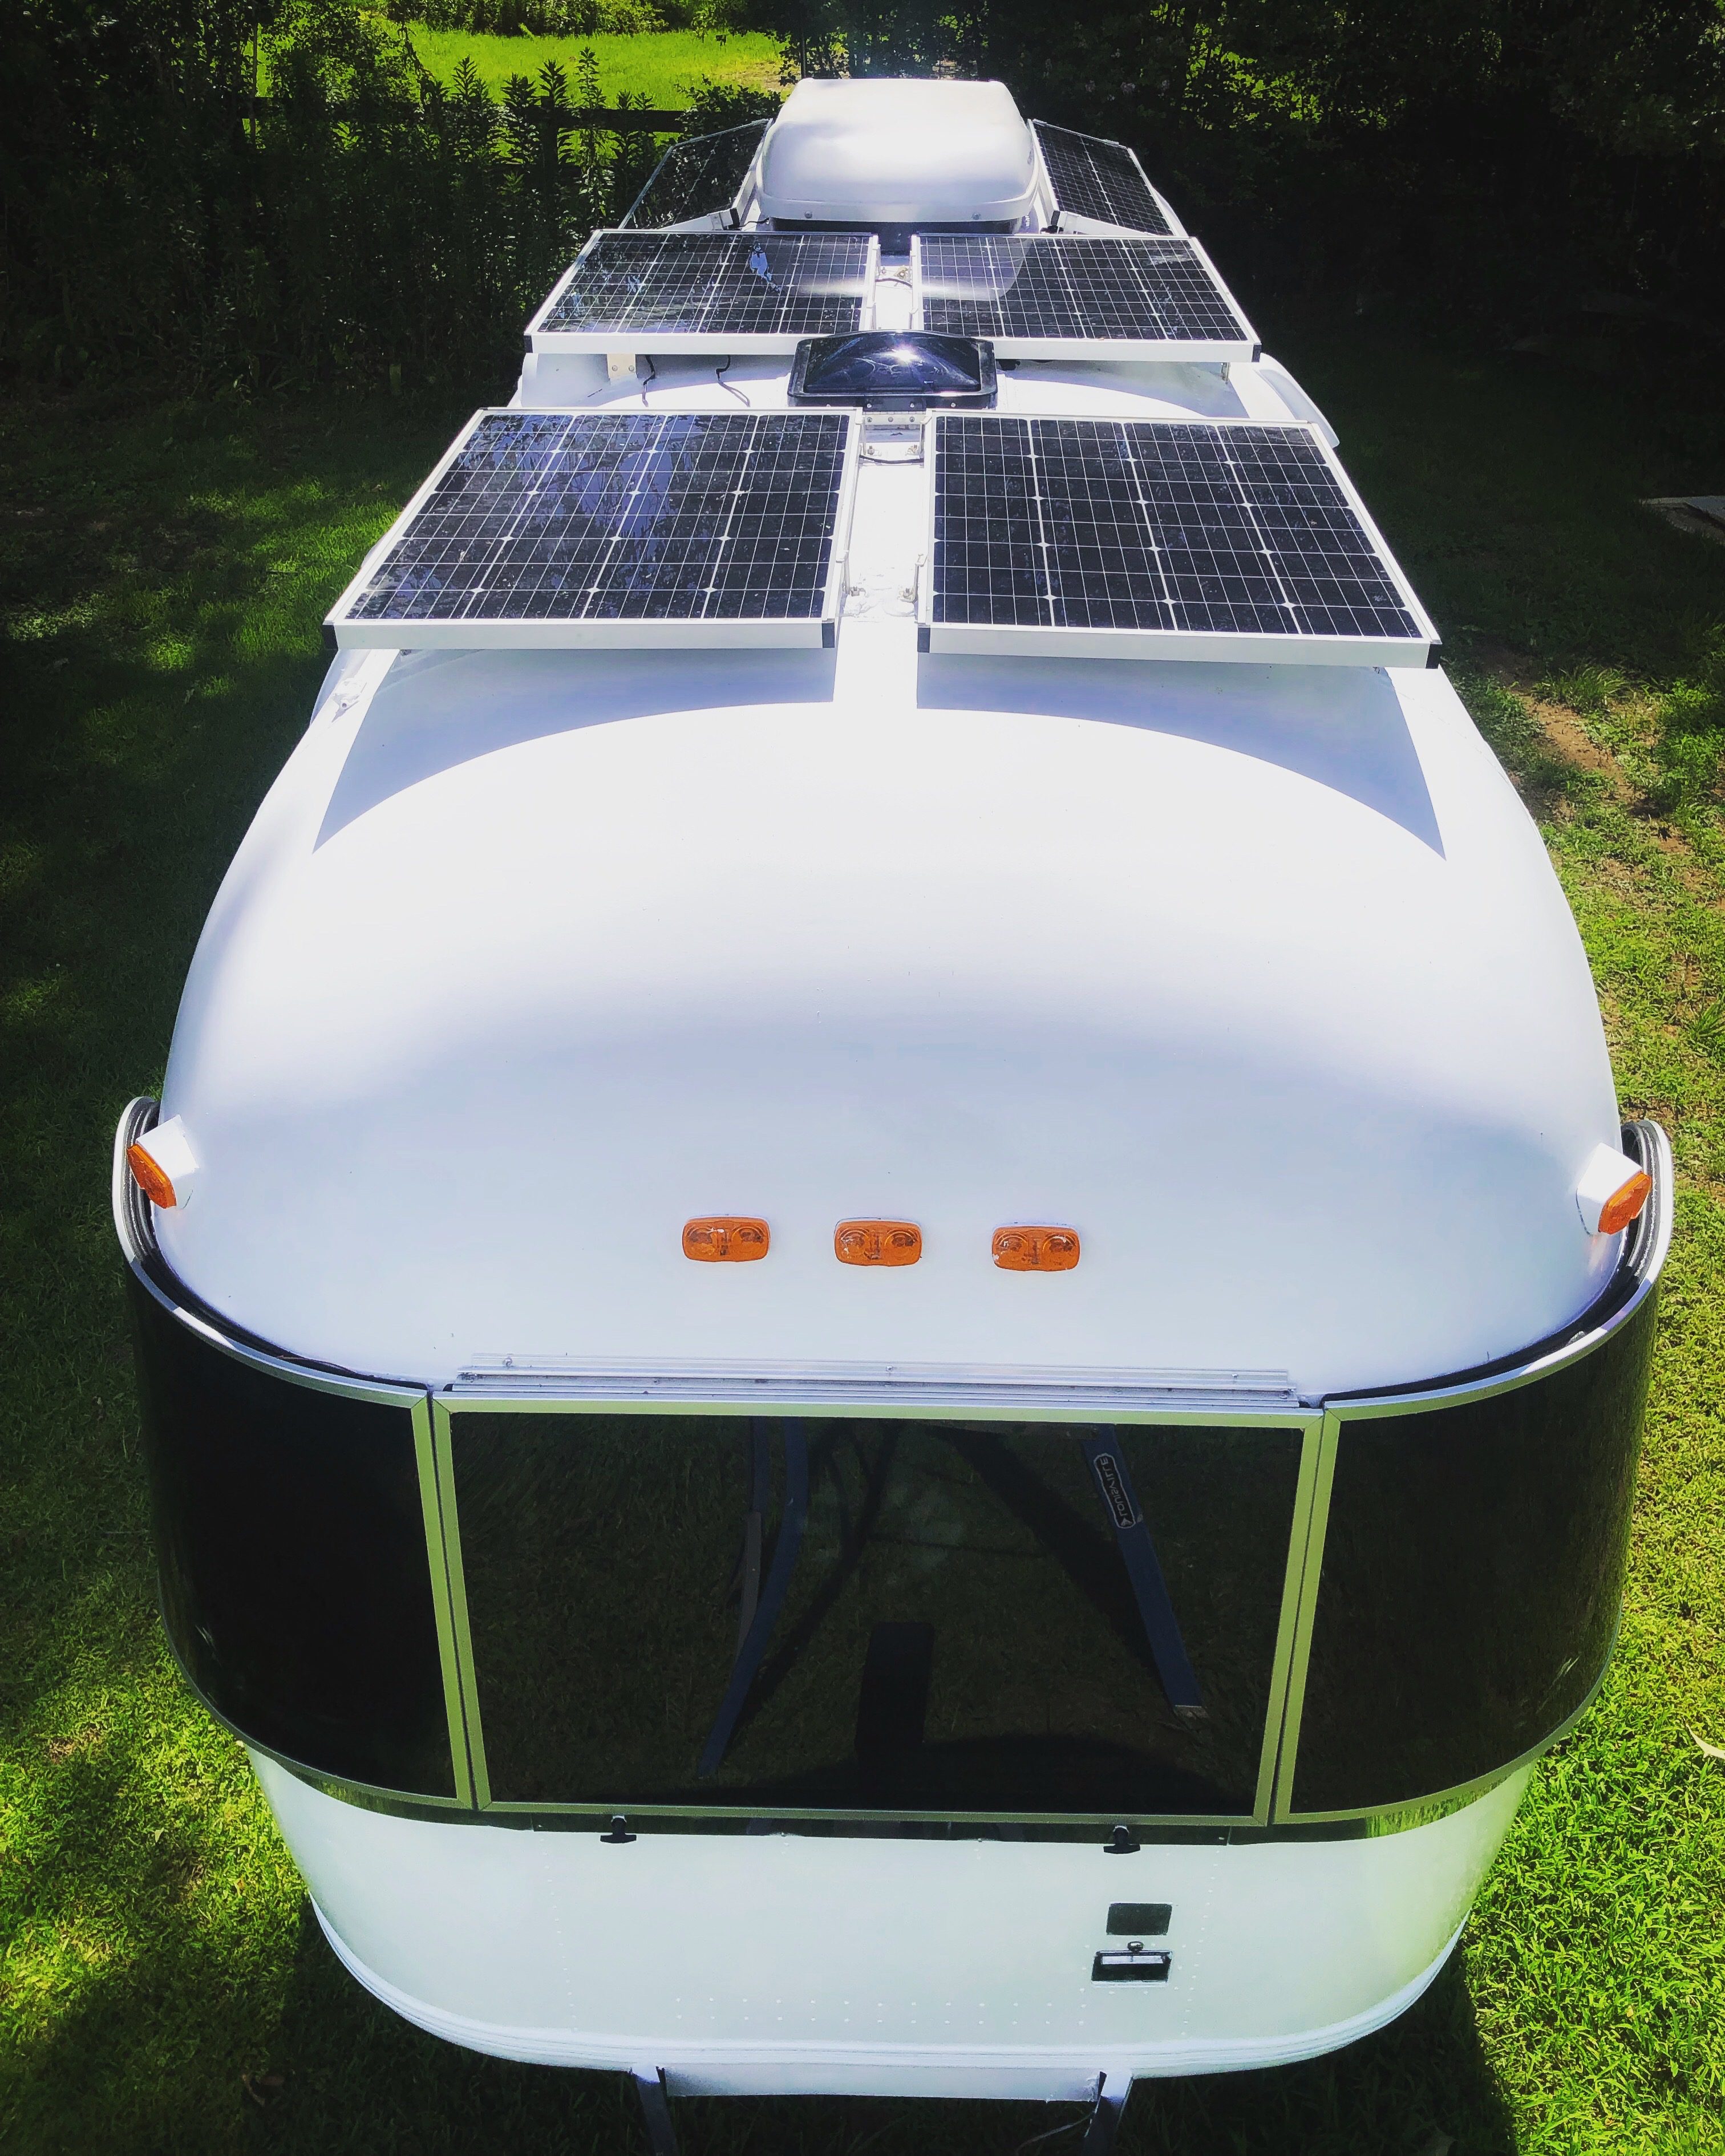
Lithium Battery System and Solar Array for our Airstream Argosy Renovation
We love boondocking, so making sure our rig was fully equipped with the best off-grid system was really important to us. We knew we wanted lithium batteries and had met the founders of Battle Born batteries way back in August last year and we fell in love with the company and their product.
We installed 500ah of batteries and a sweet hybrid inverter from Victron!
So we have this awesome battery system, how are we charging these bad boys? We managed to fit 640watts of Zamp solar panels on our very tiny roof. The unique size of their long 90 watt panels were great for working around our AC unit and roof vents.
We are so thrilled with this set up and it was a breeze to install. We did however add some homemade extenders to the brackets to accommodate the curve of our roof.

We have to give a huge shout out to Tom and Caitlin Morton of Mortons on the Move.
They were a huge help in this build and Tom is the electrical genius we needed to get this system done right! We don’t know what we did to deserve friends like them, but be sure to check out their video about our electrical system!
Front Bed Custom for Airstream Argosy
We decided to go with a front bed layout with the bath in the rear for our Airstream Argosy. This floor plan created the most functional space in our rig and the super comfy bed up front is so inviting.
I may have taken quite a few work breaks to test out the comfort level and ease my swollen feet during the last months of this reno and my pregnancy.
I do however recommend the mattress! We went with a custom mattress from Mattress Insider. After living with the most uncomfortable bed in the Fiber Stream for years, we knew we wanted a quality mattress but didn’t know how to accommodate the front curves.
Our first thought was buying a cheap memory foam mattress on Amazon and chop the corners off. Also, no standard mattress would be the right length to fit wall to wall, so we would have had a gap or had to cut off length too. It seemed like a lot of work to maybe end up with a poor fit and a mattress we hated…
Thankfully, our friends RV Geeks told us about Mattress Insider and that they are super comfy and do custom shapes and sizes! We made a template for them, got our mattress within a week and it was a perfect fit!
It feels so amazing and they helped us pick the perfect mattress for our sleeping preferences. You can learn more about our bed here – Custom Airstream Mattress by Mattress Insider
Airstream Argosy Interior Design/Decor
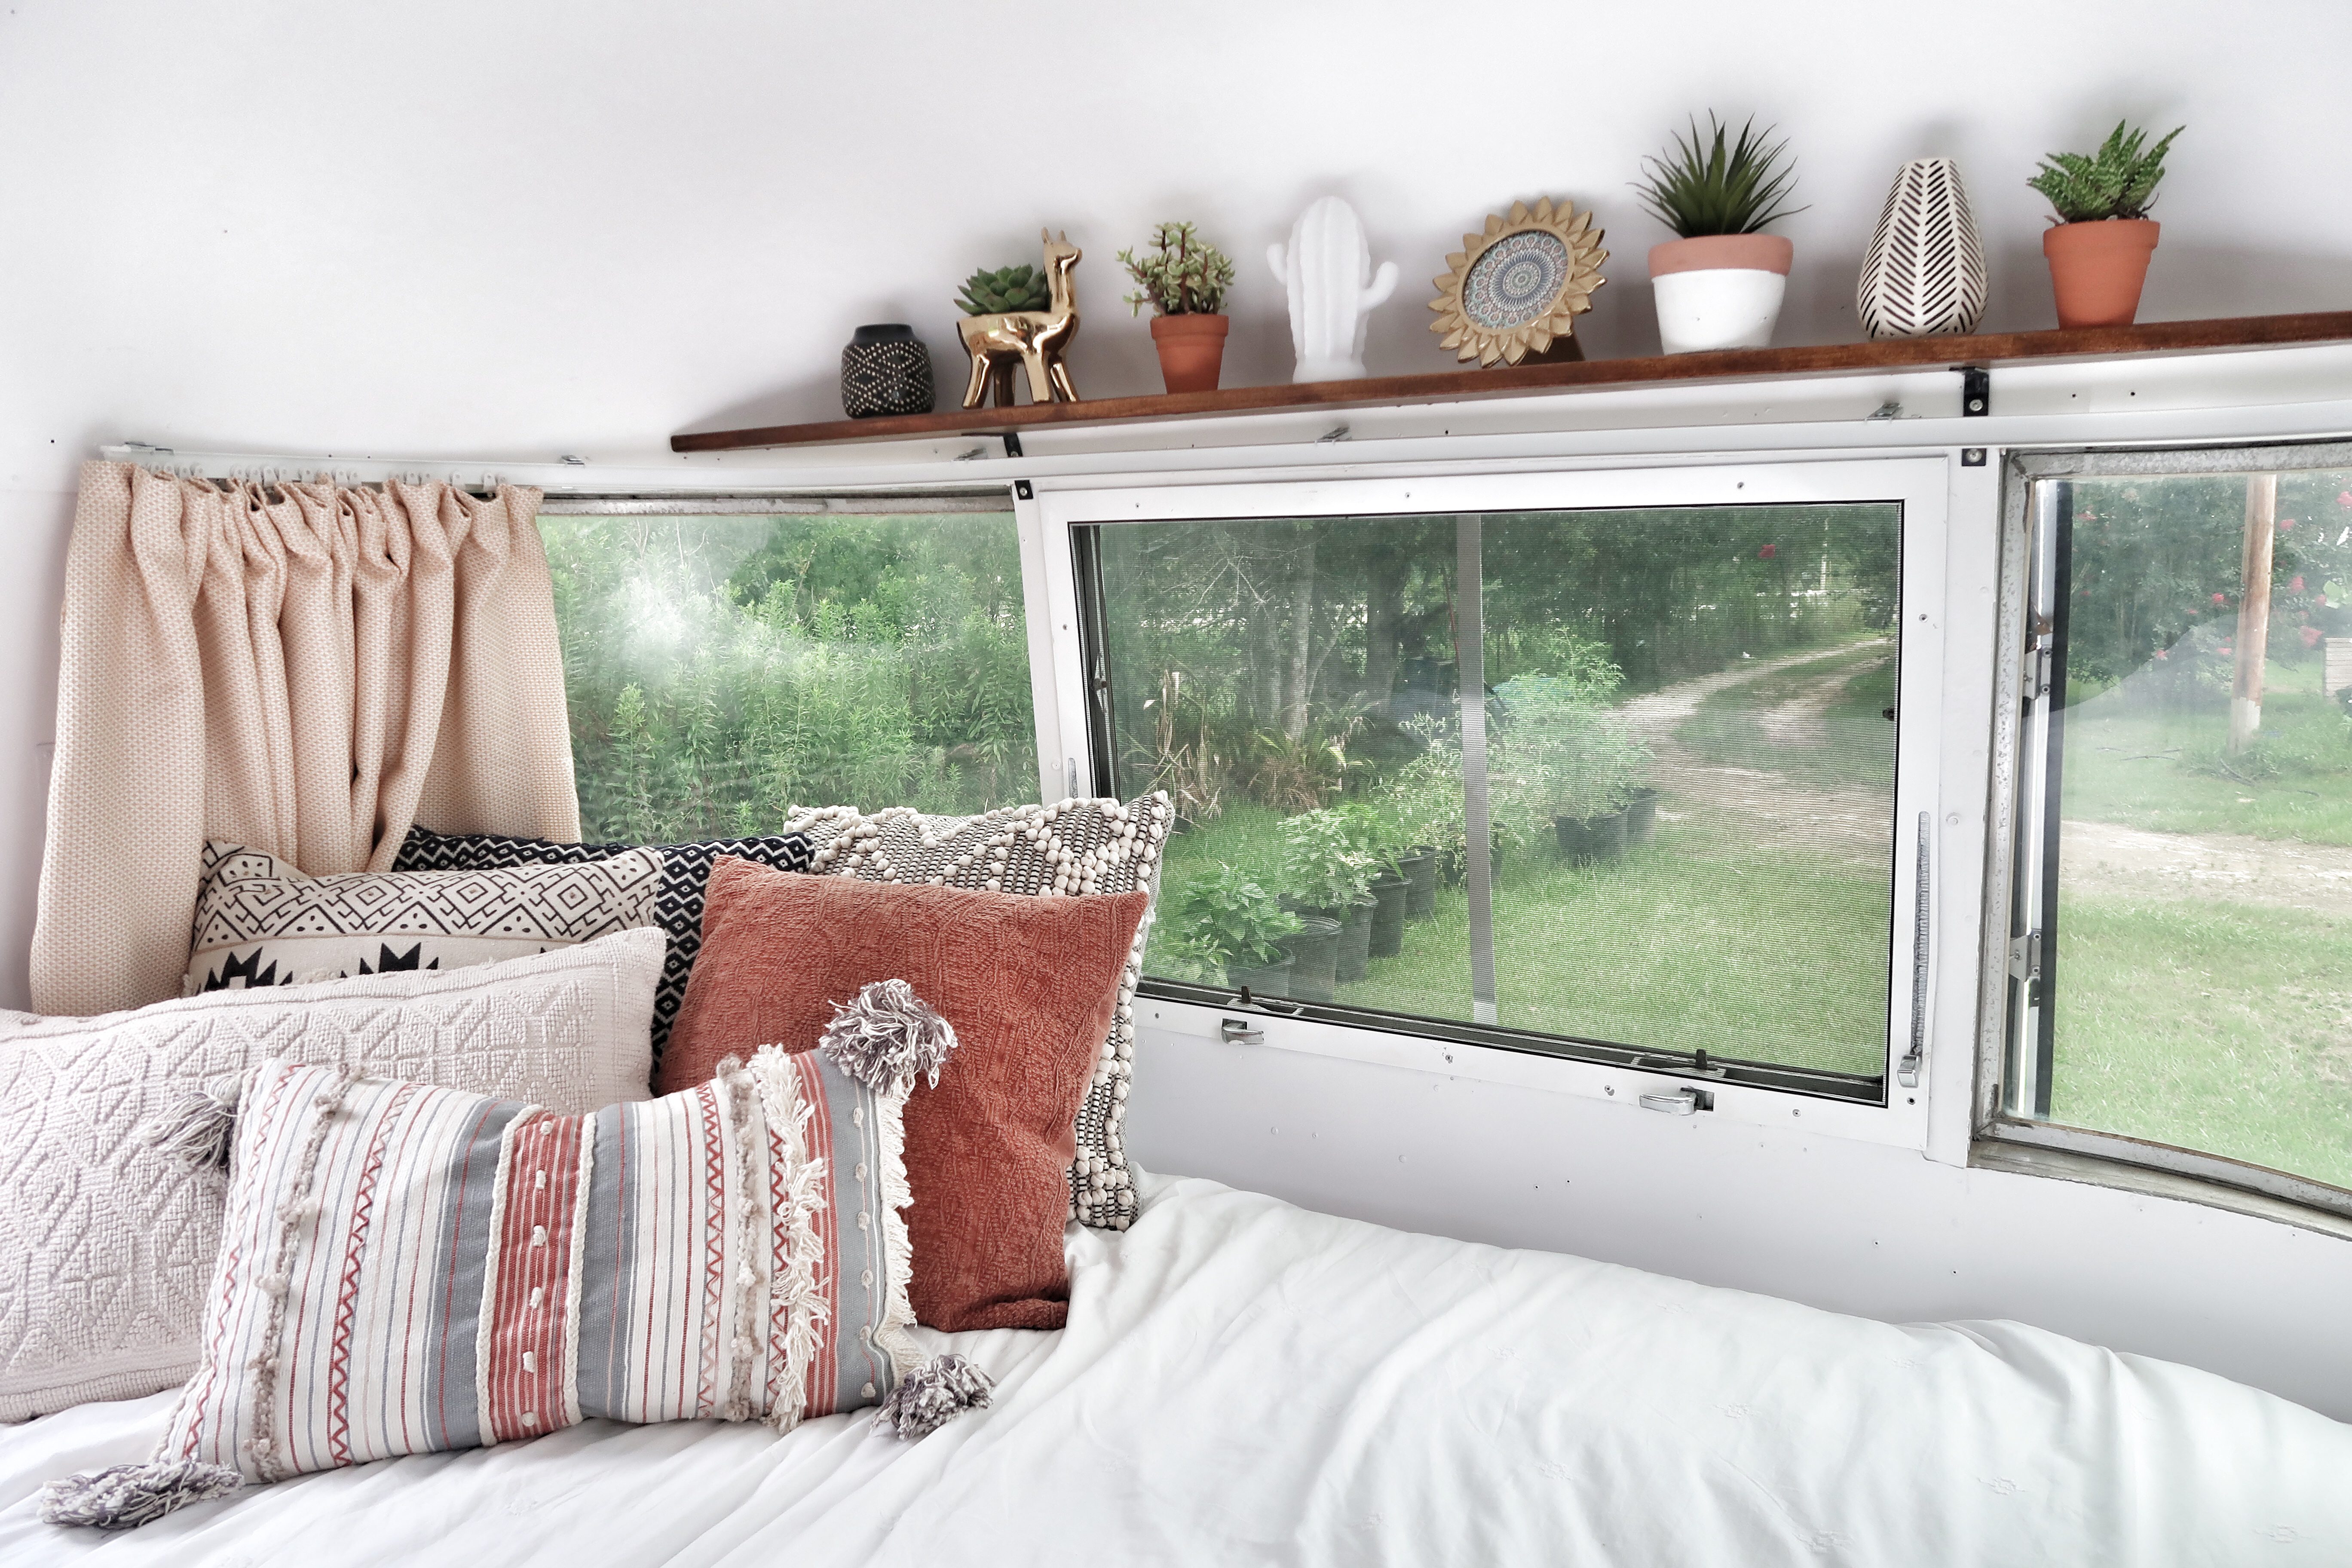
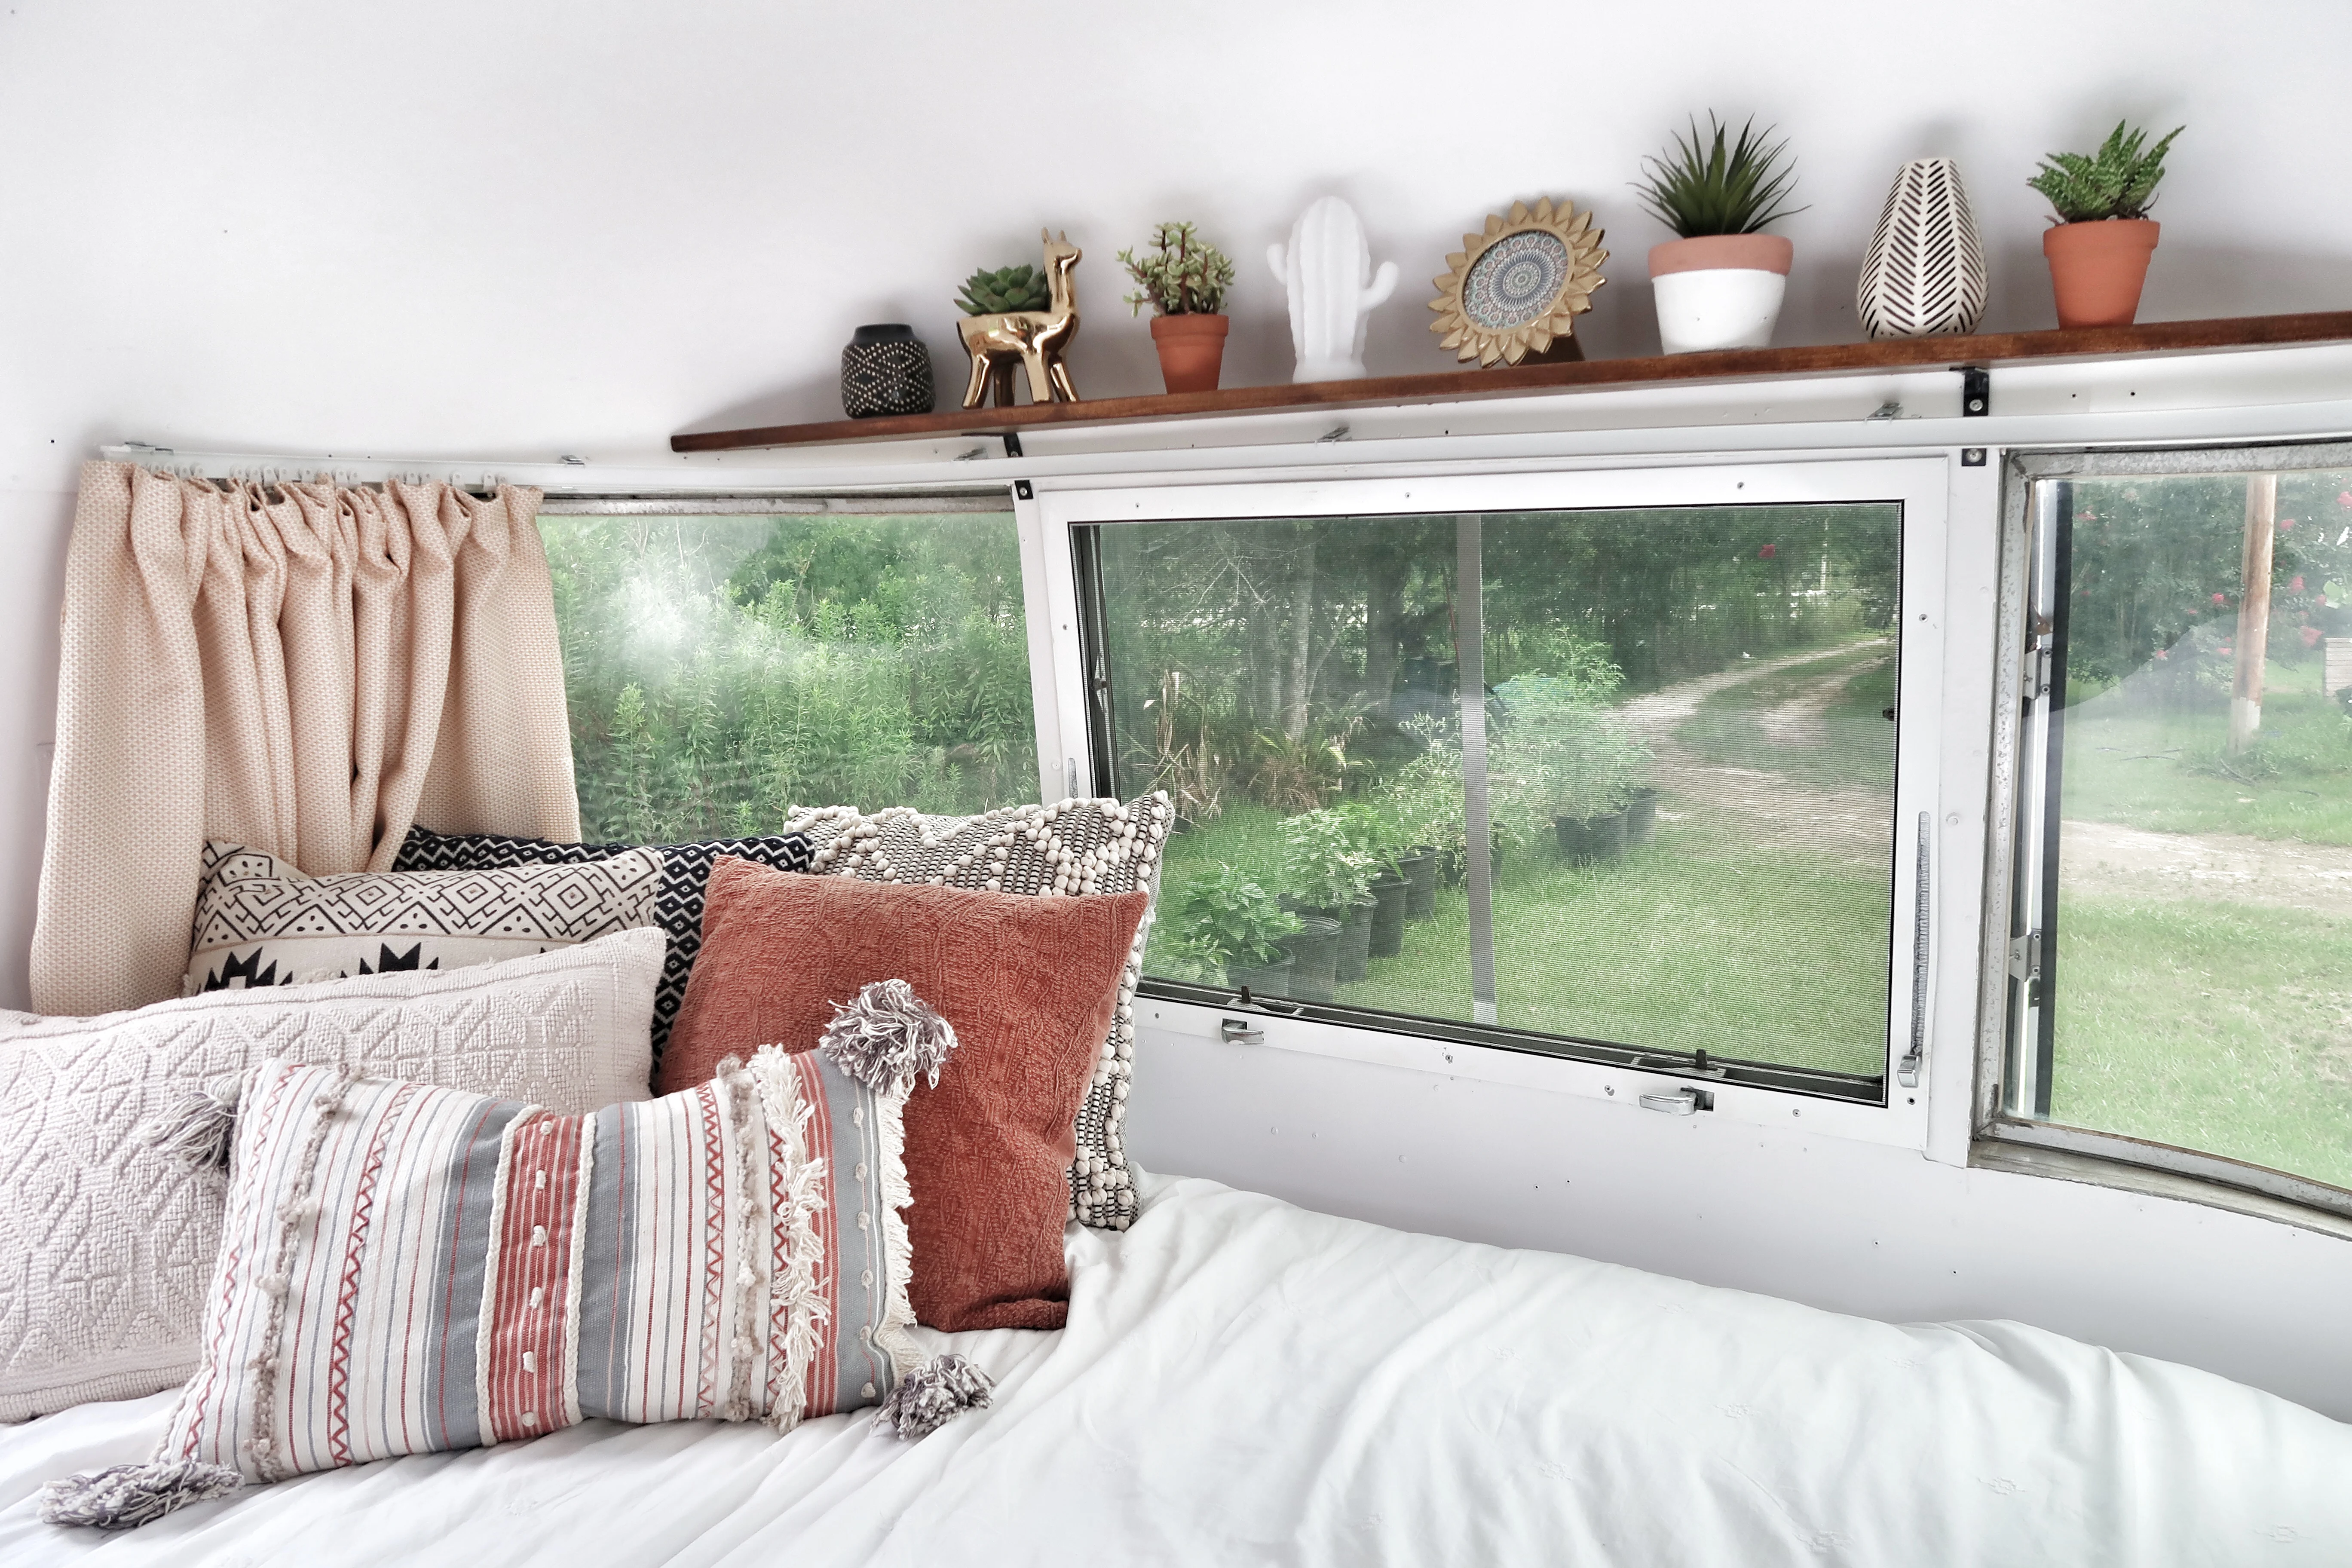
We wanted to keep things bright and airy by keeping the walls and cabinets white, but have some contrast by adding dark hardware and a dark walnut stained butchers block counter top.
It’s 10 feet long and I love it dearly. It extends past the kitchen to serve as an eating area, desk or even more prep space.
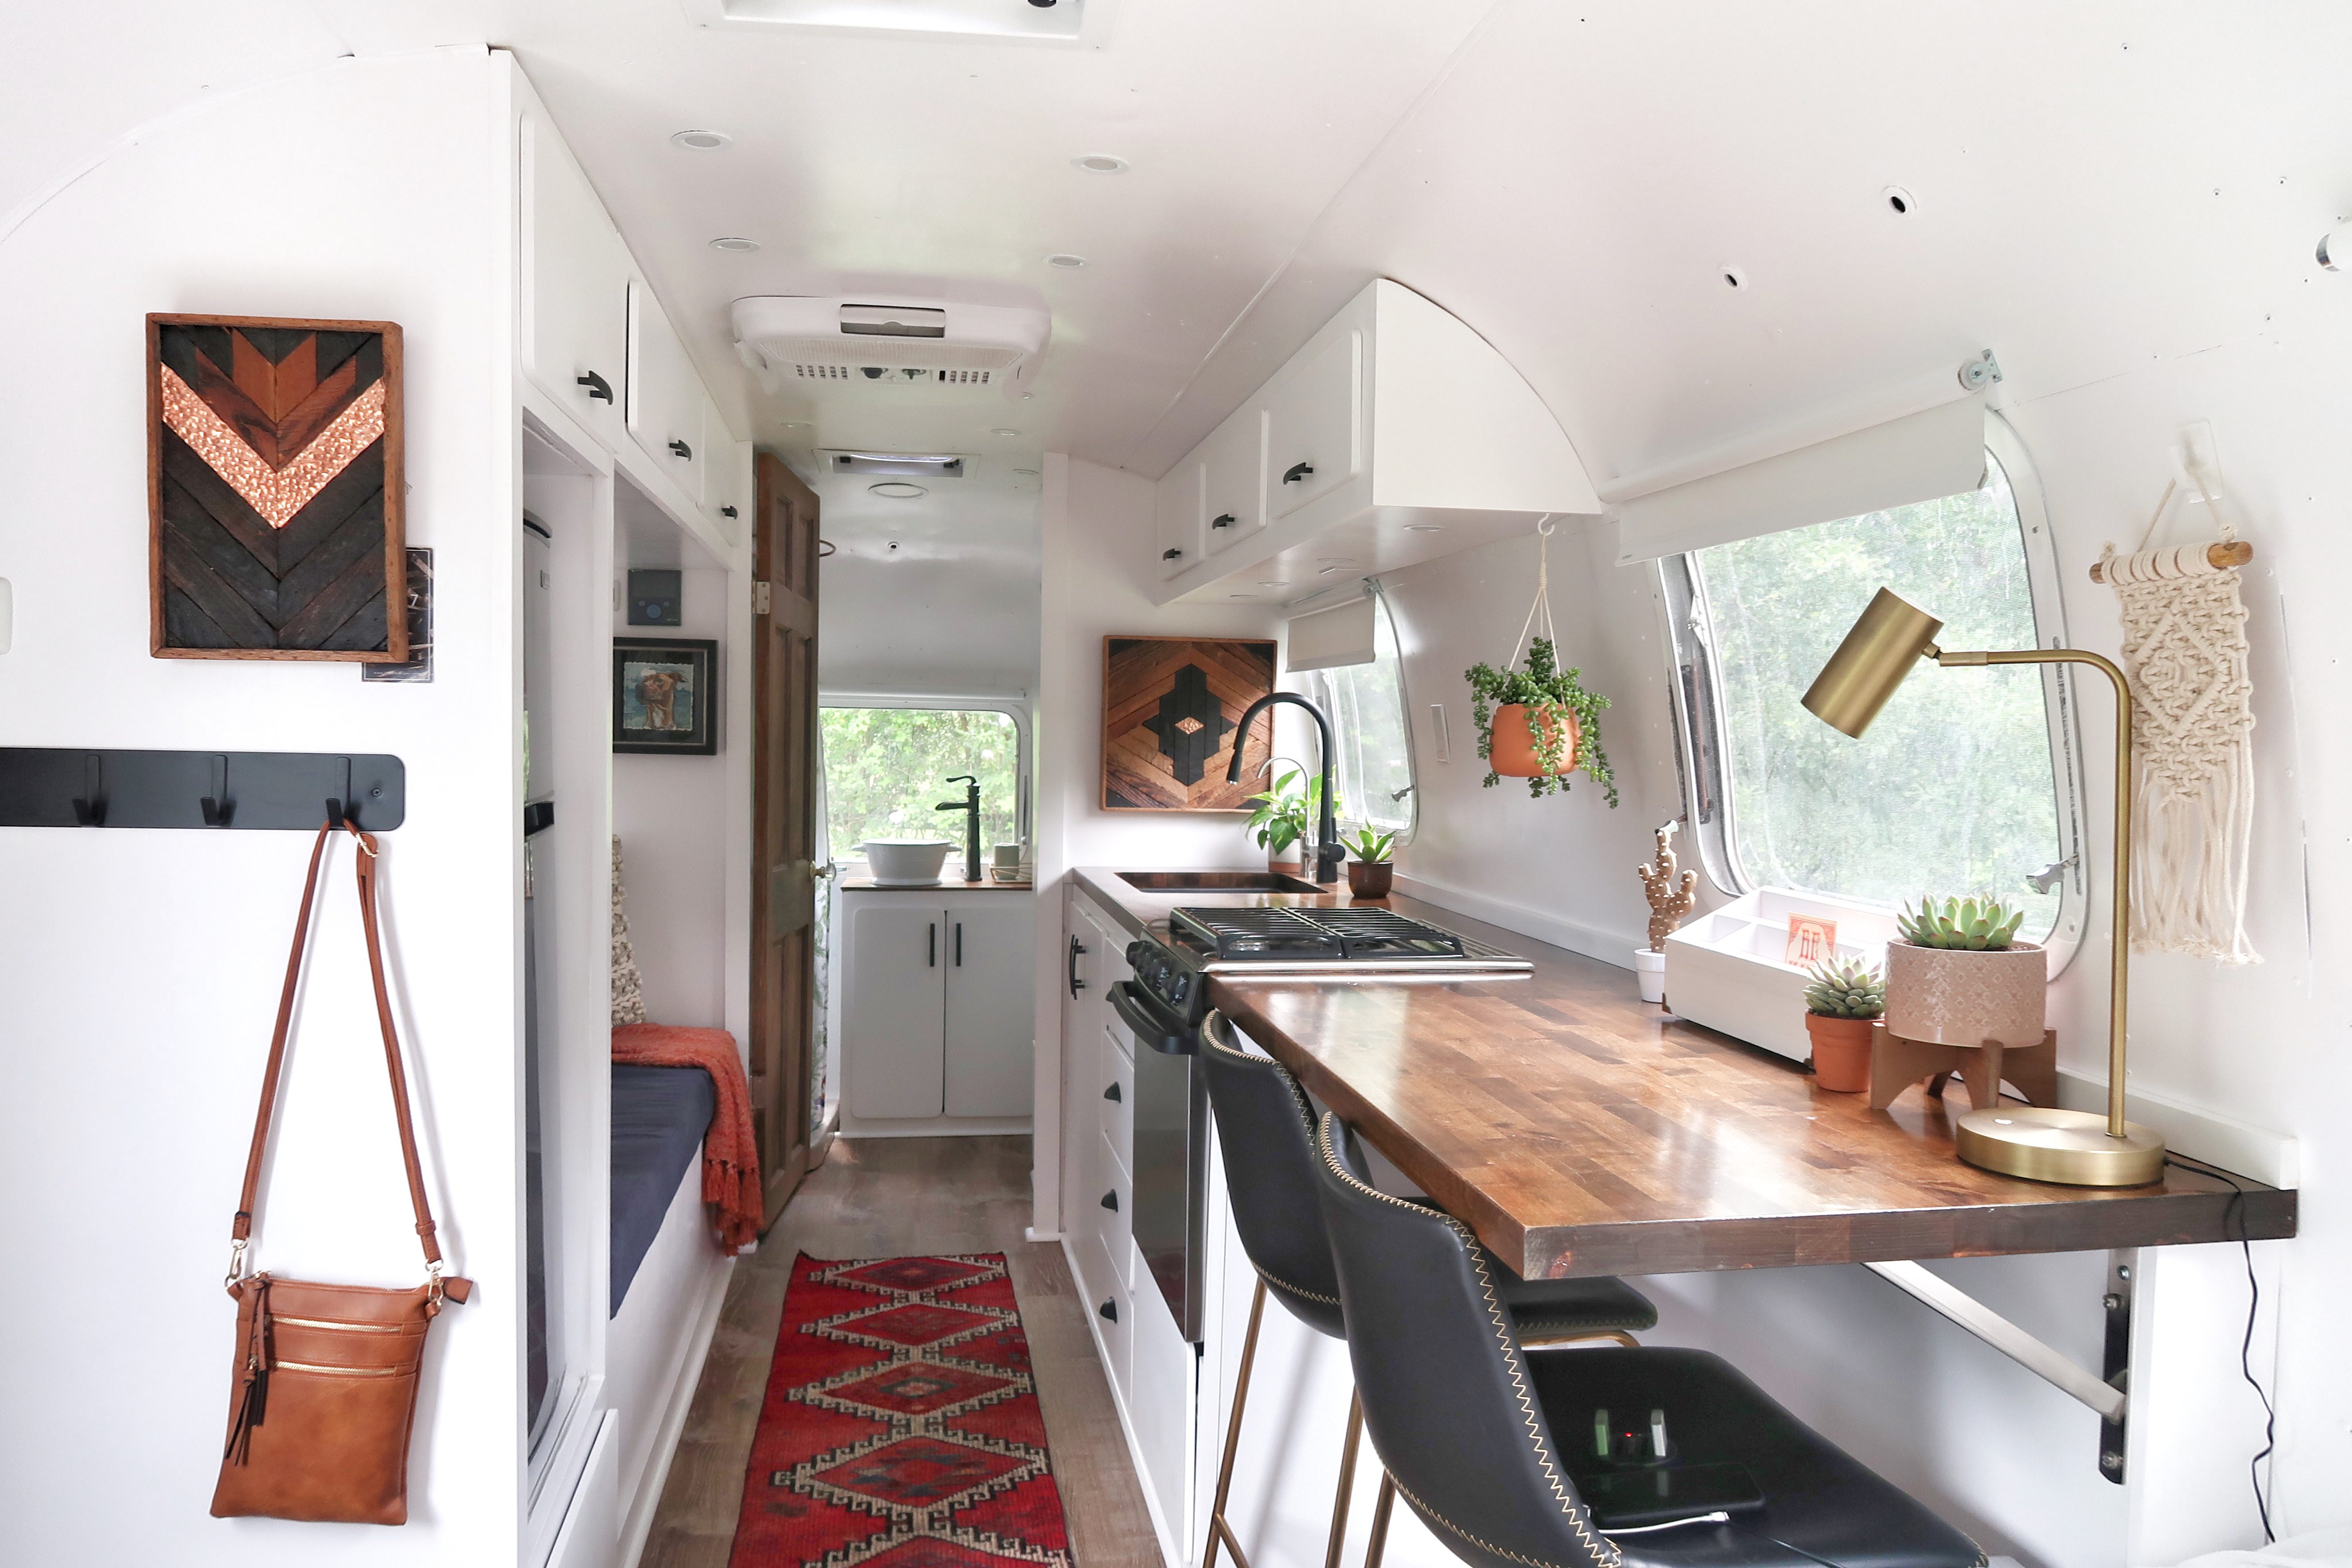

I also have a very large farmhouse sink that I’m pretty sure is going to be life changing and looks perfect for baby bath time.

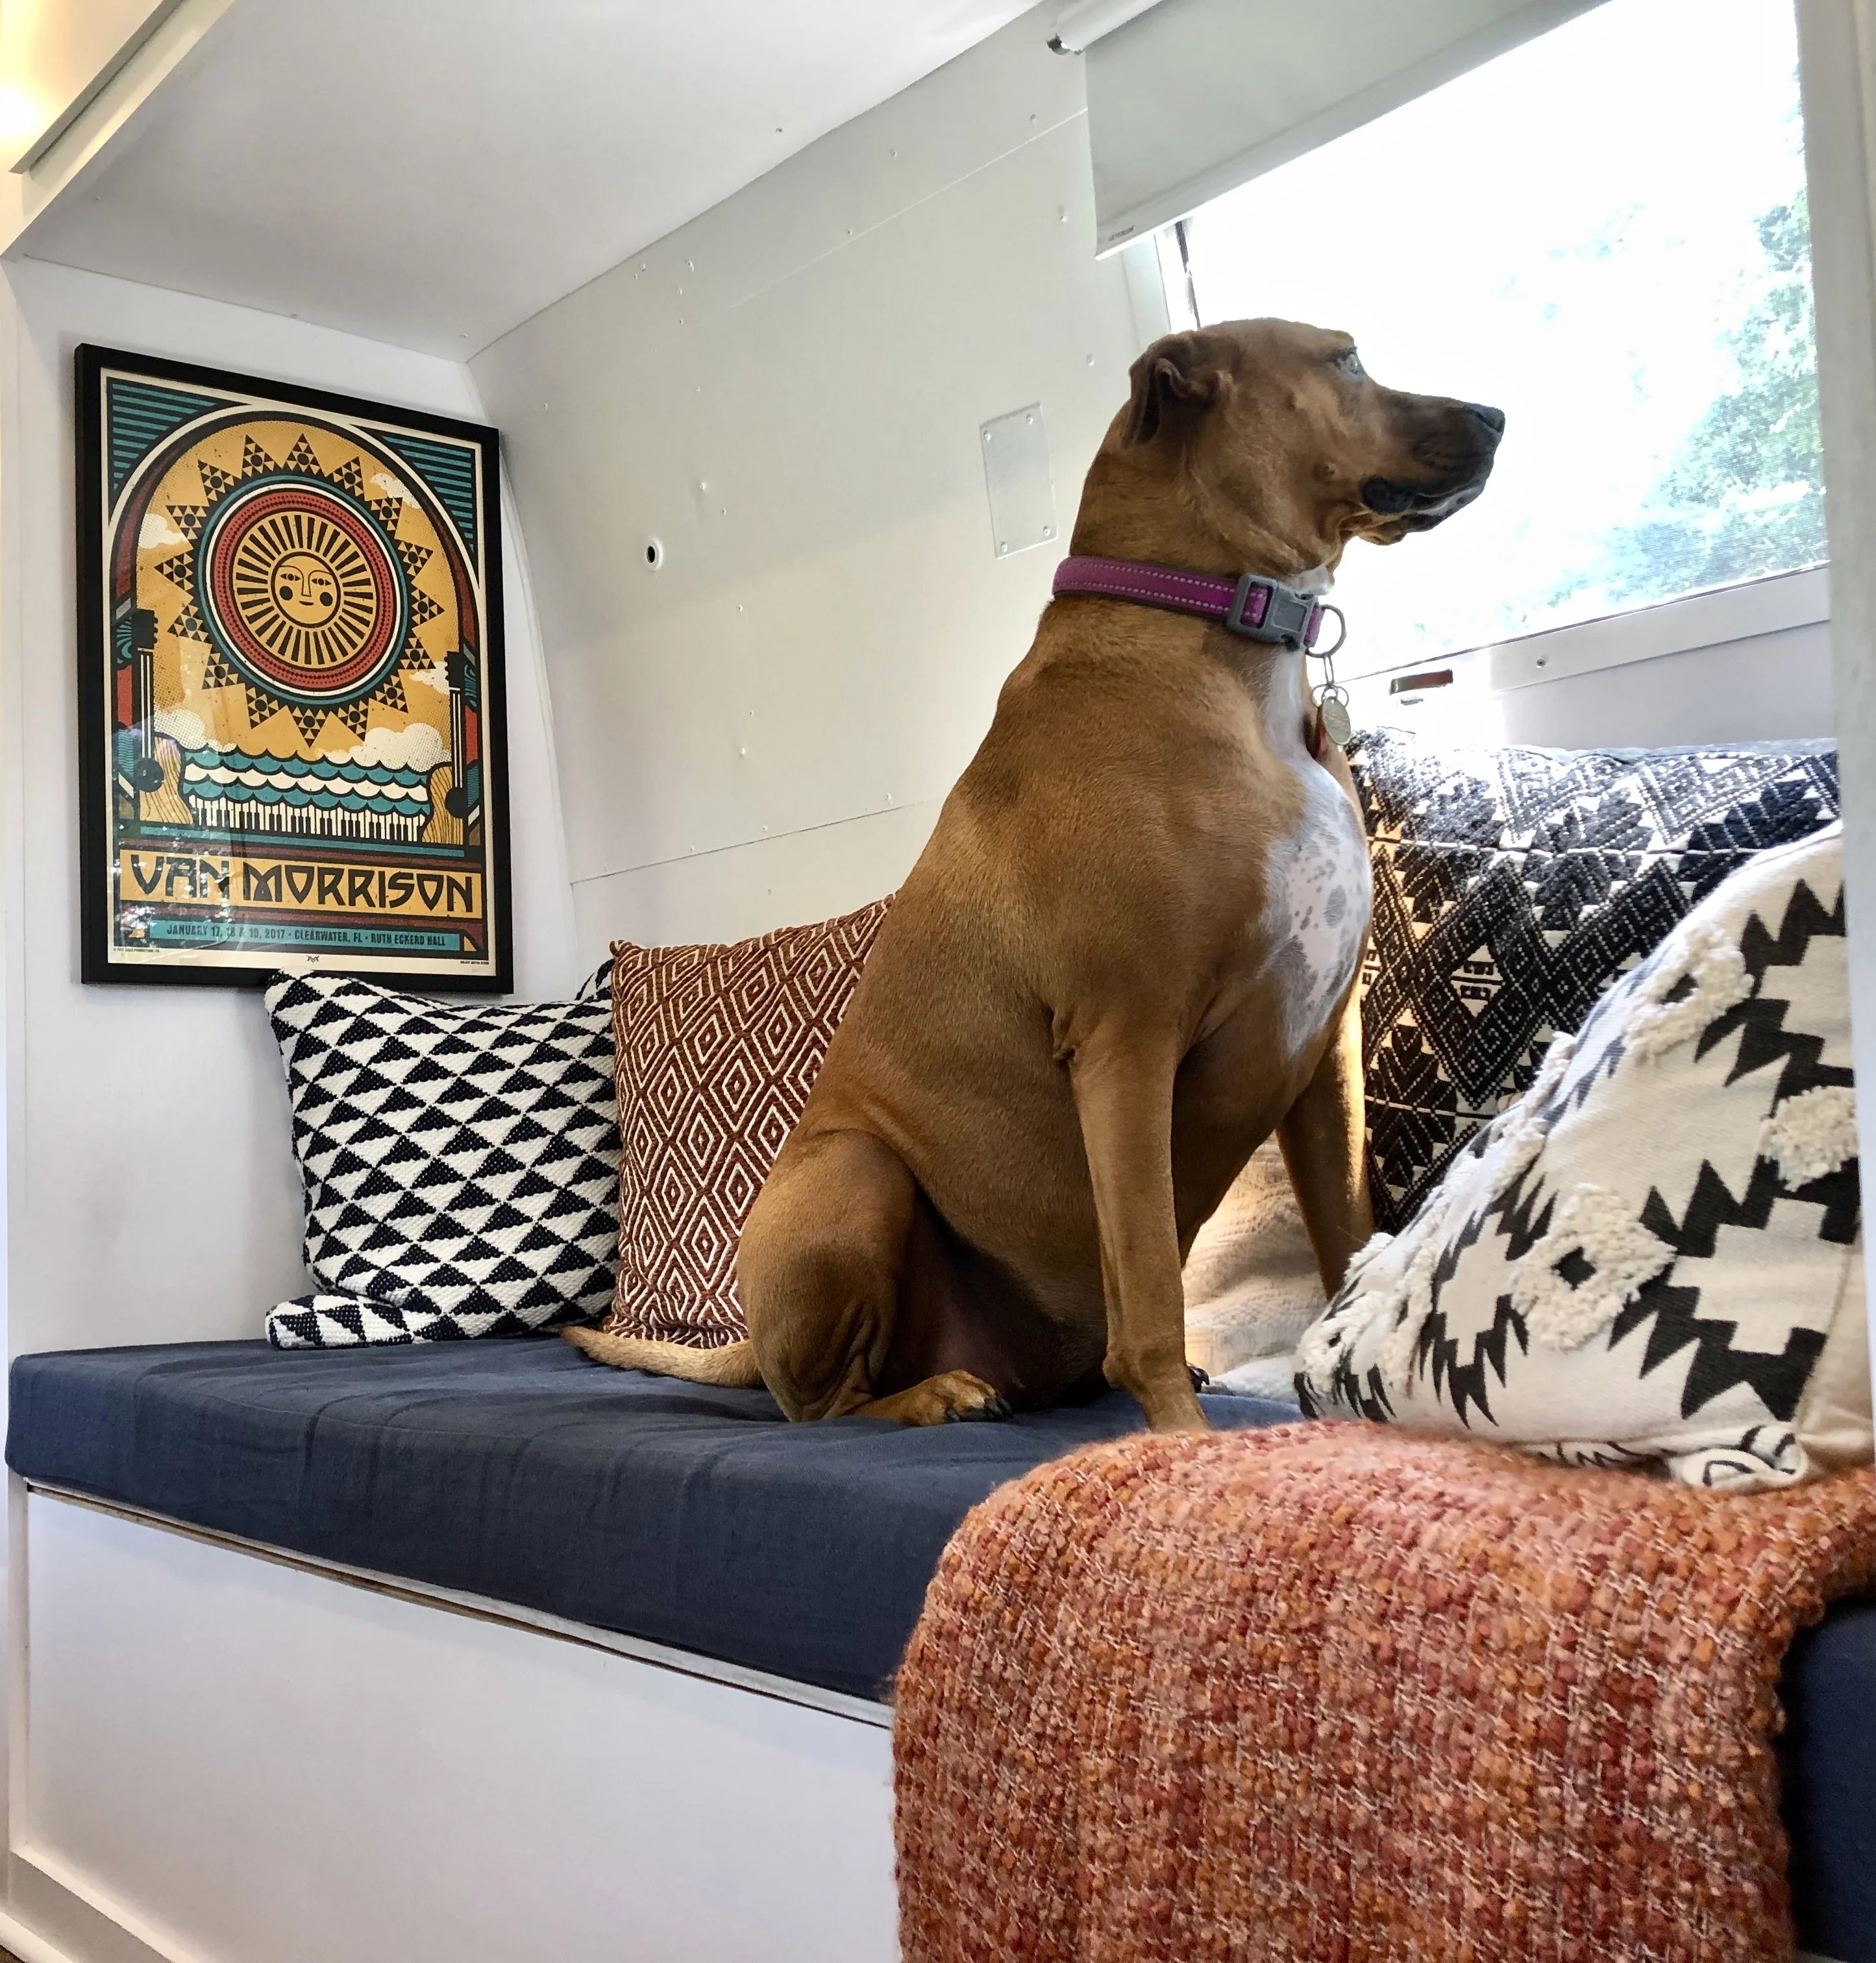
Speaking of babies, where is our little girl going to sleep? In her very own bed! Right across from the kitchen is a bench/ bed area that we will use as a couch during the day and a baby bed at night.
It’s large enough for me and Kyle to take a nap on, so it’s roomy enough for her to grow into. I think River would argue it’s her bed though..
We added some color and texture to the space with tons of fun pillows and plants. It’s all the little things that make it feel like home.
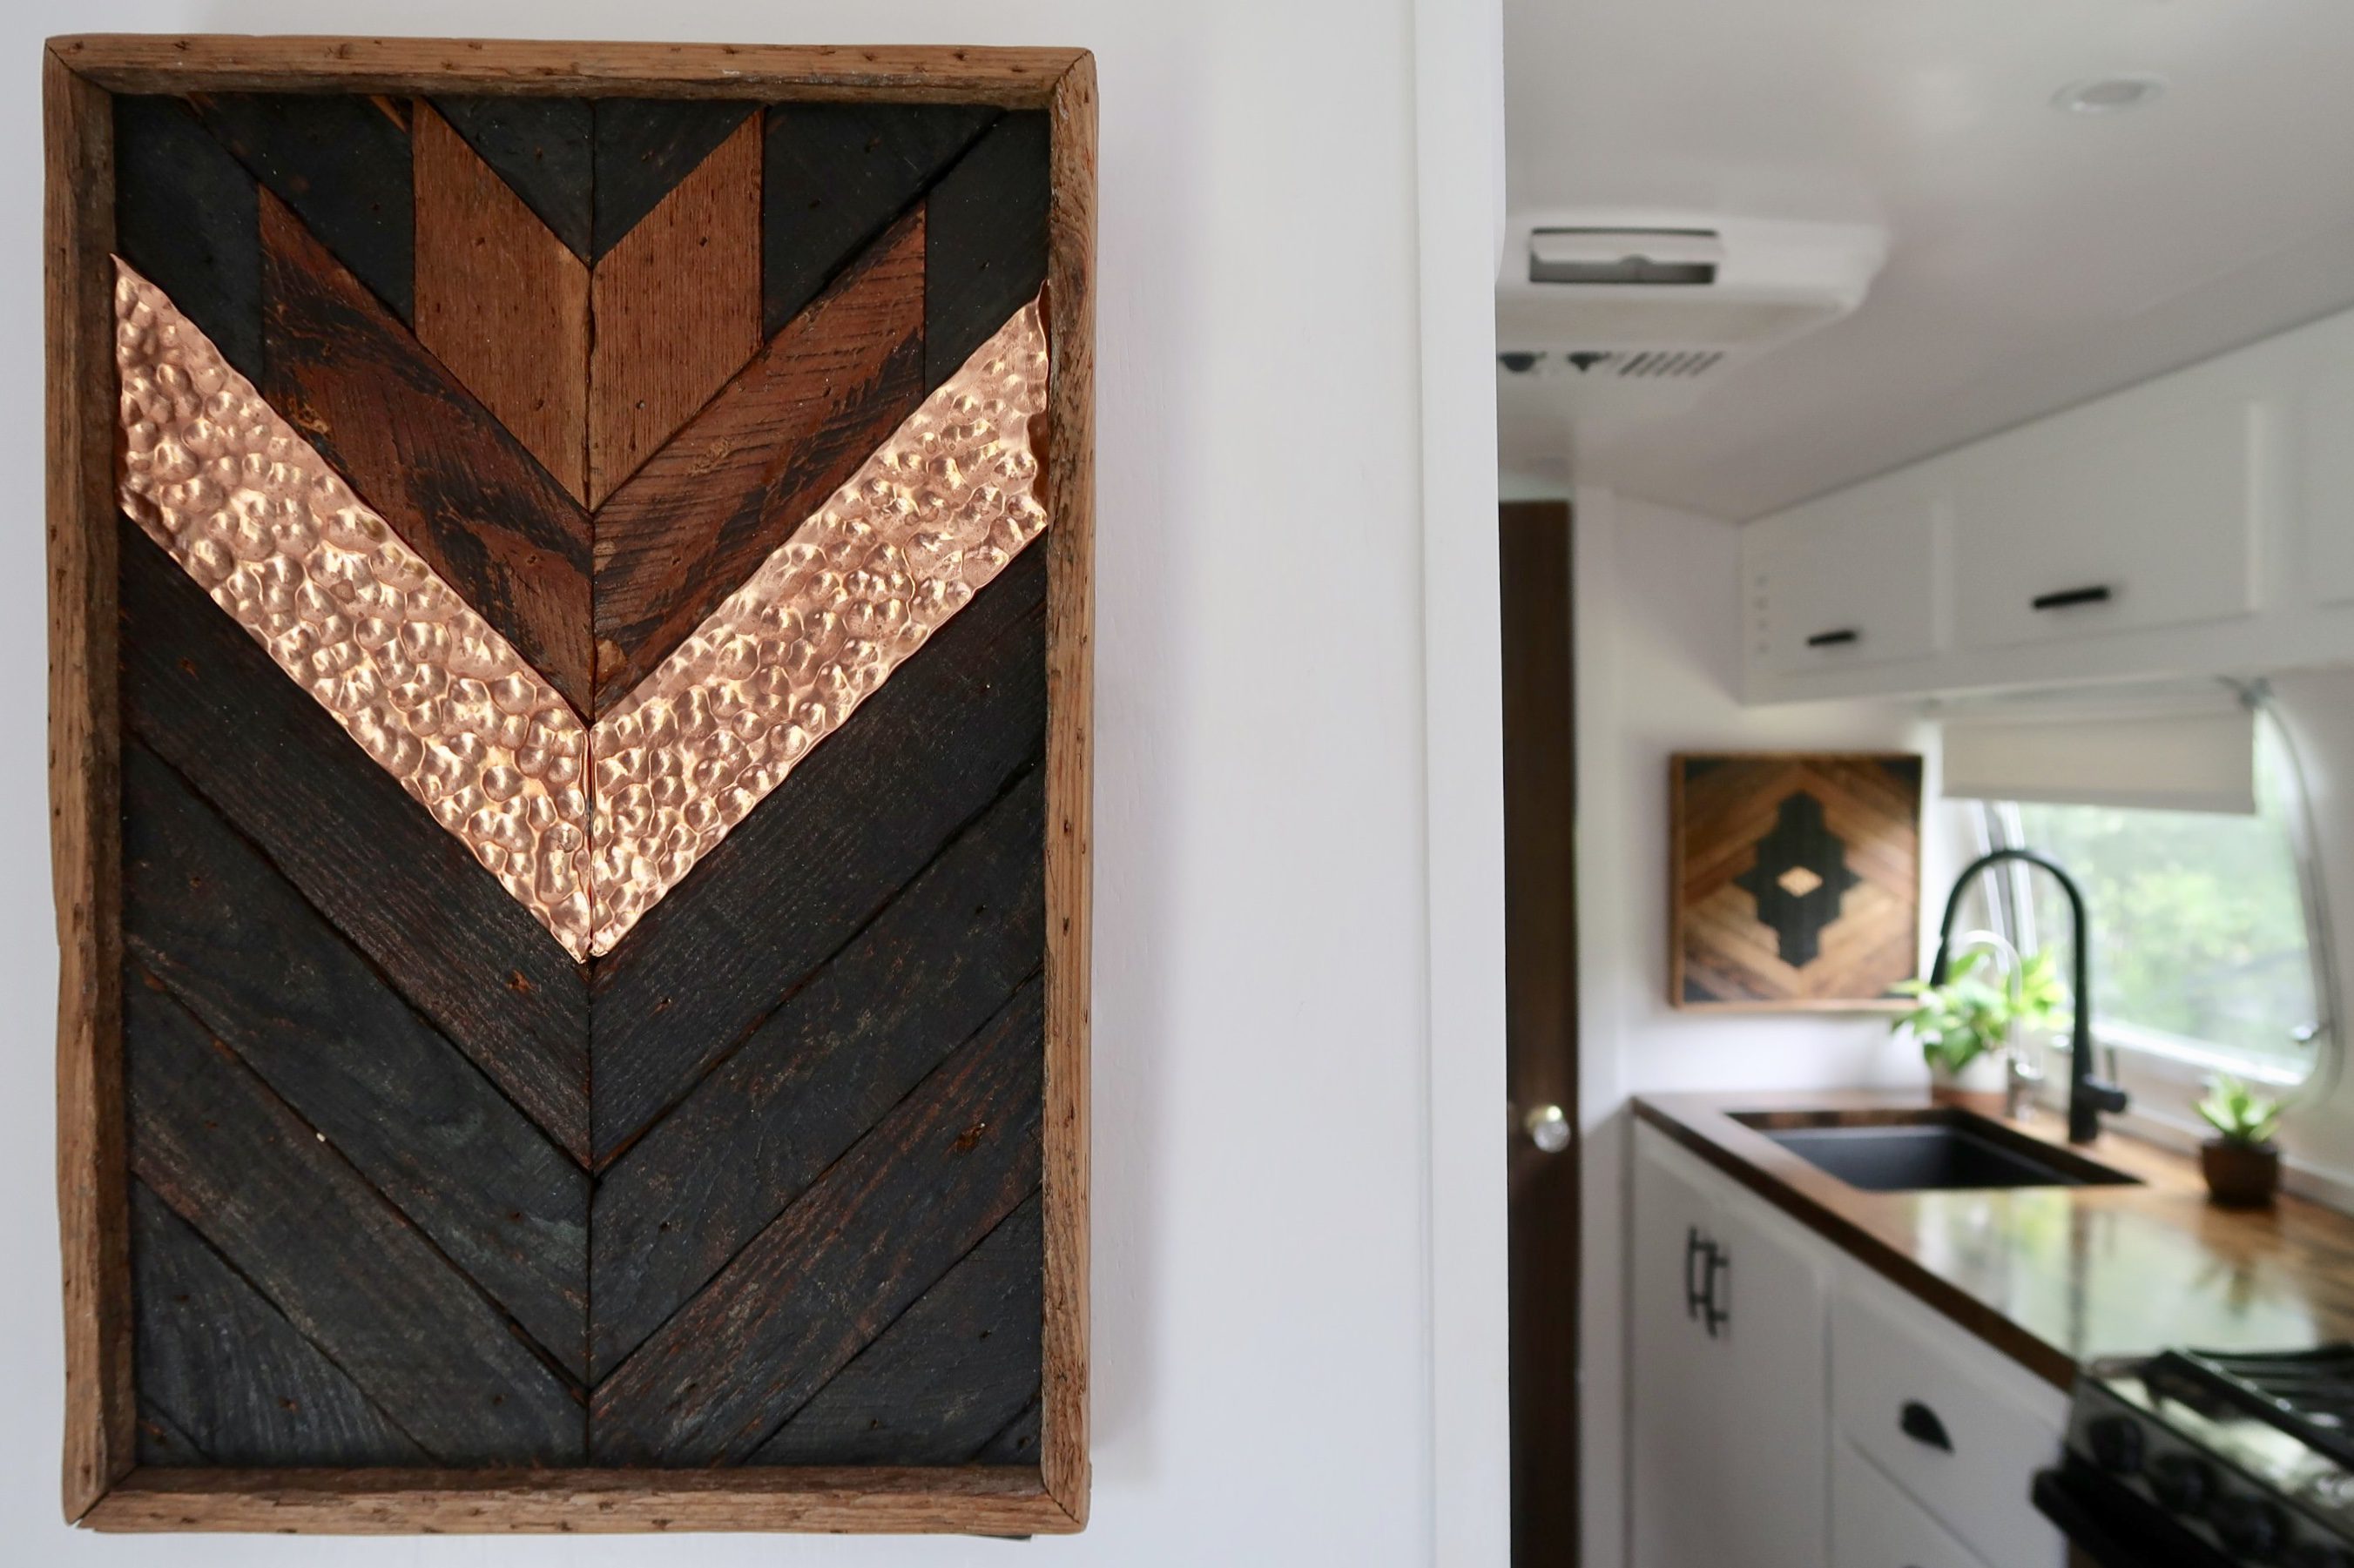
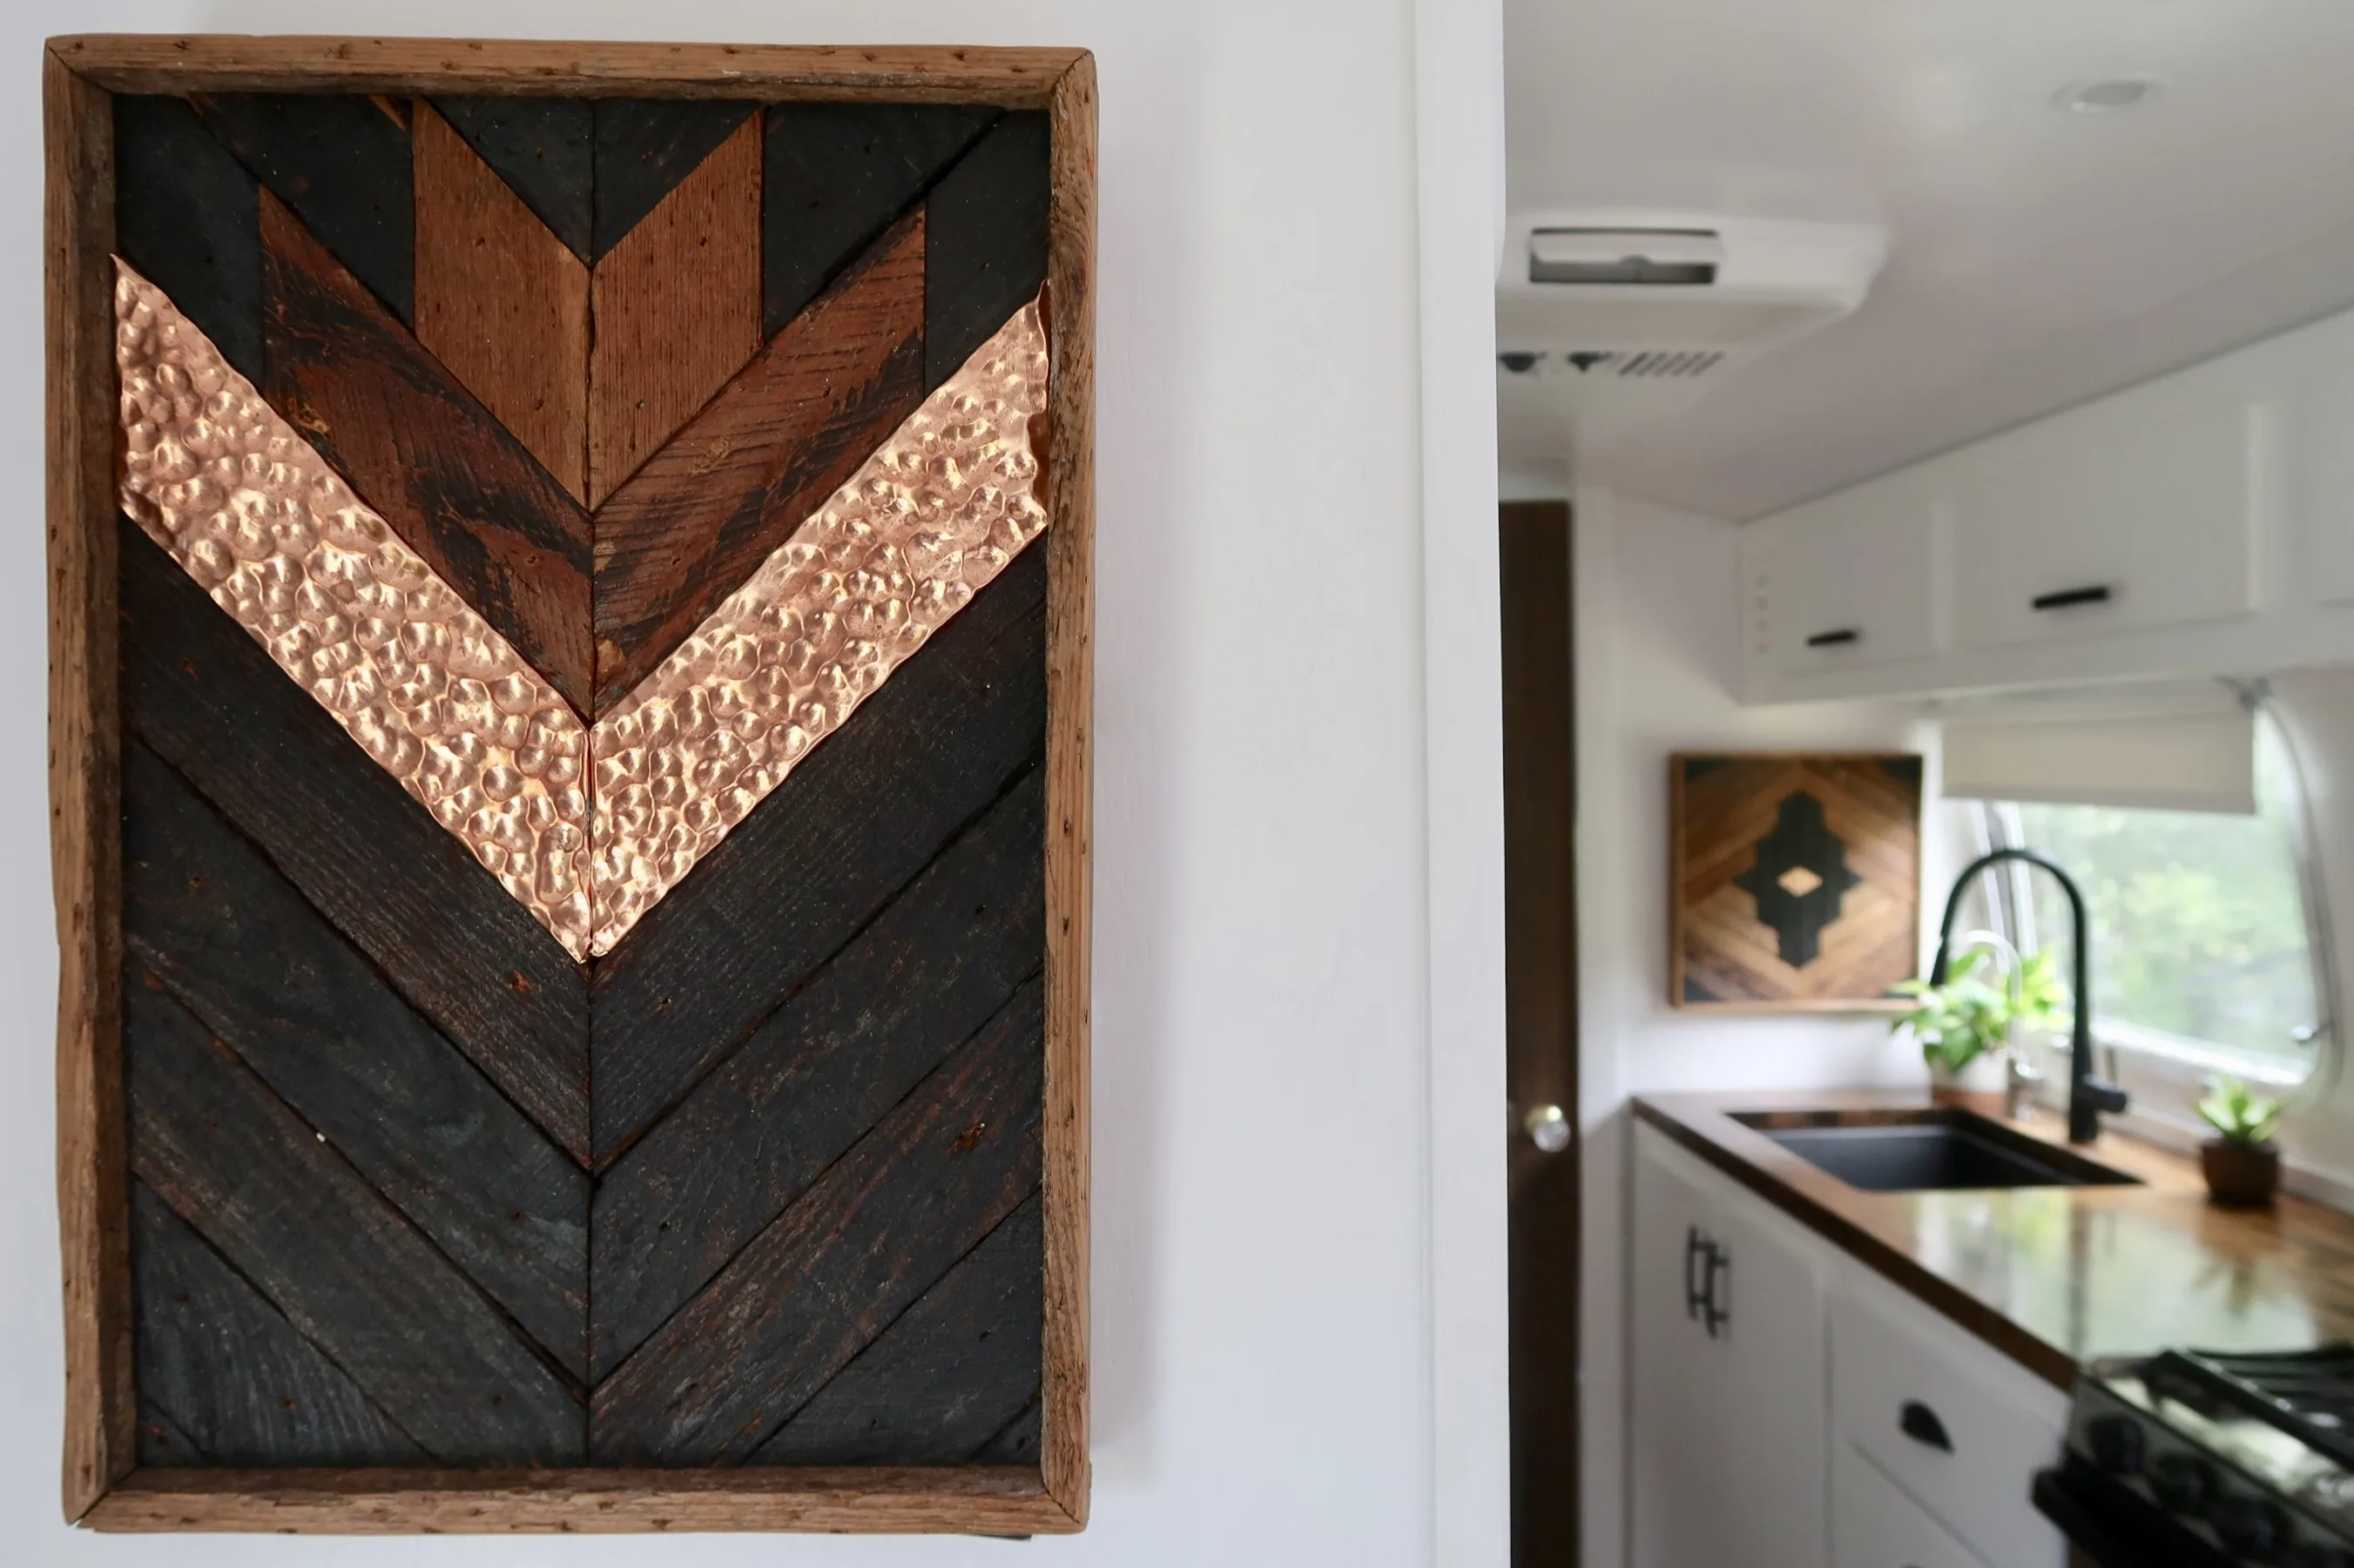
We don’t have a ton of flat wall space to work with so we had to make it count with some beautiful art. We stumbled upon this company called 1767 in Nashville and fell in love with the beautiful pieces they created from salvaged materials from old homes.
It was right in line with our passion for giving old things new life, so now we have two gorgeous pieces made from materials of a home built in 1926.
Another fun piece we found to represent our love of music is a cool limited print, signed and hand printed – Van Morrison concert poster.
We found it on Etsy through a shop called Subject Matter Studio. It’s pictured above behind River in the “nook” area as we call it.
Airstream Argosy Bathroom Renovation Reveal

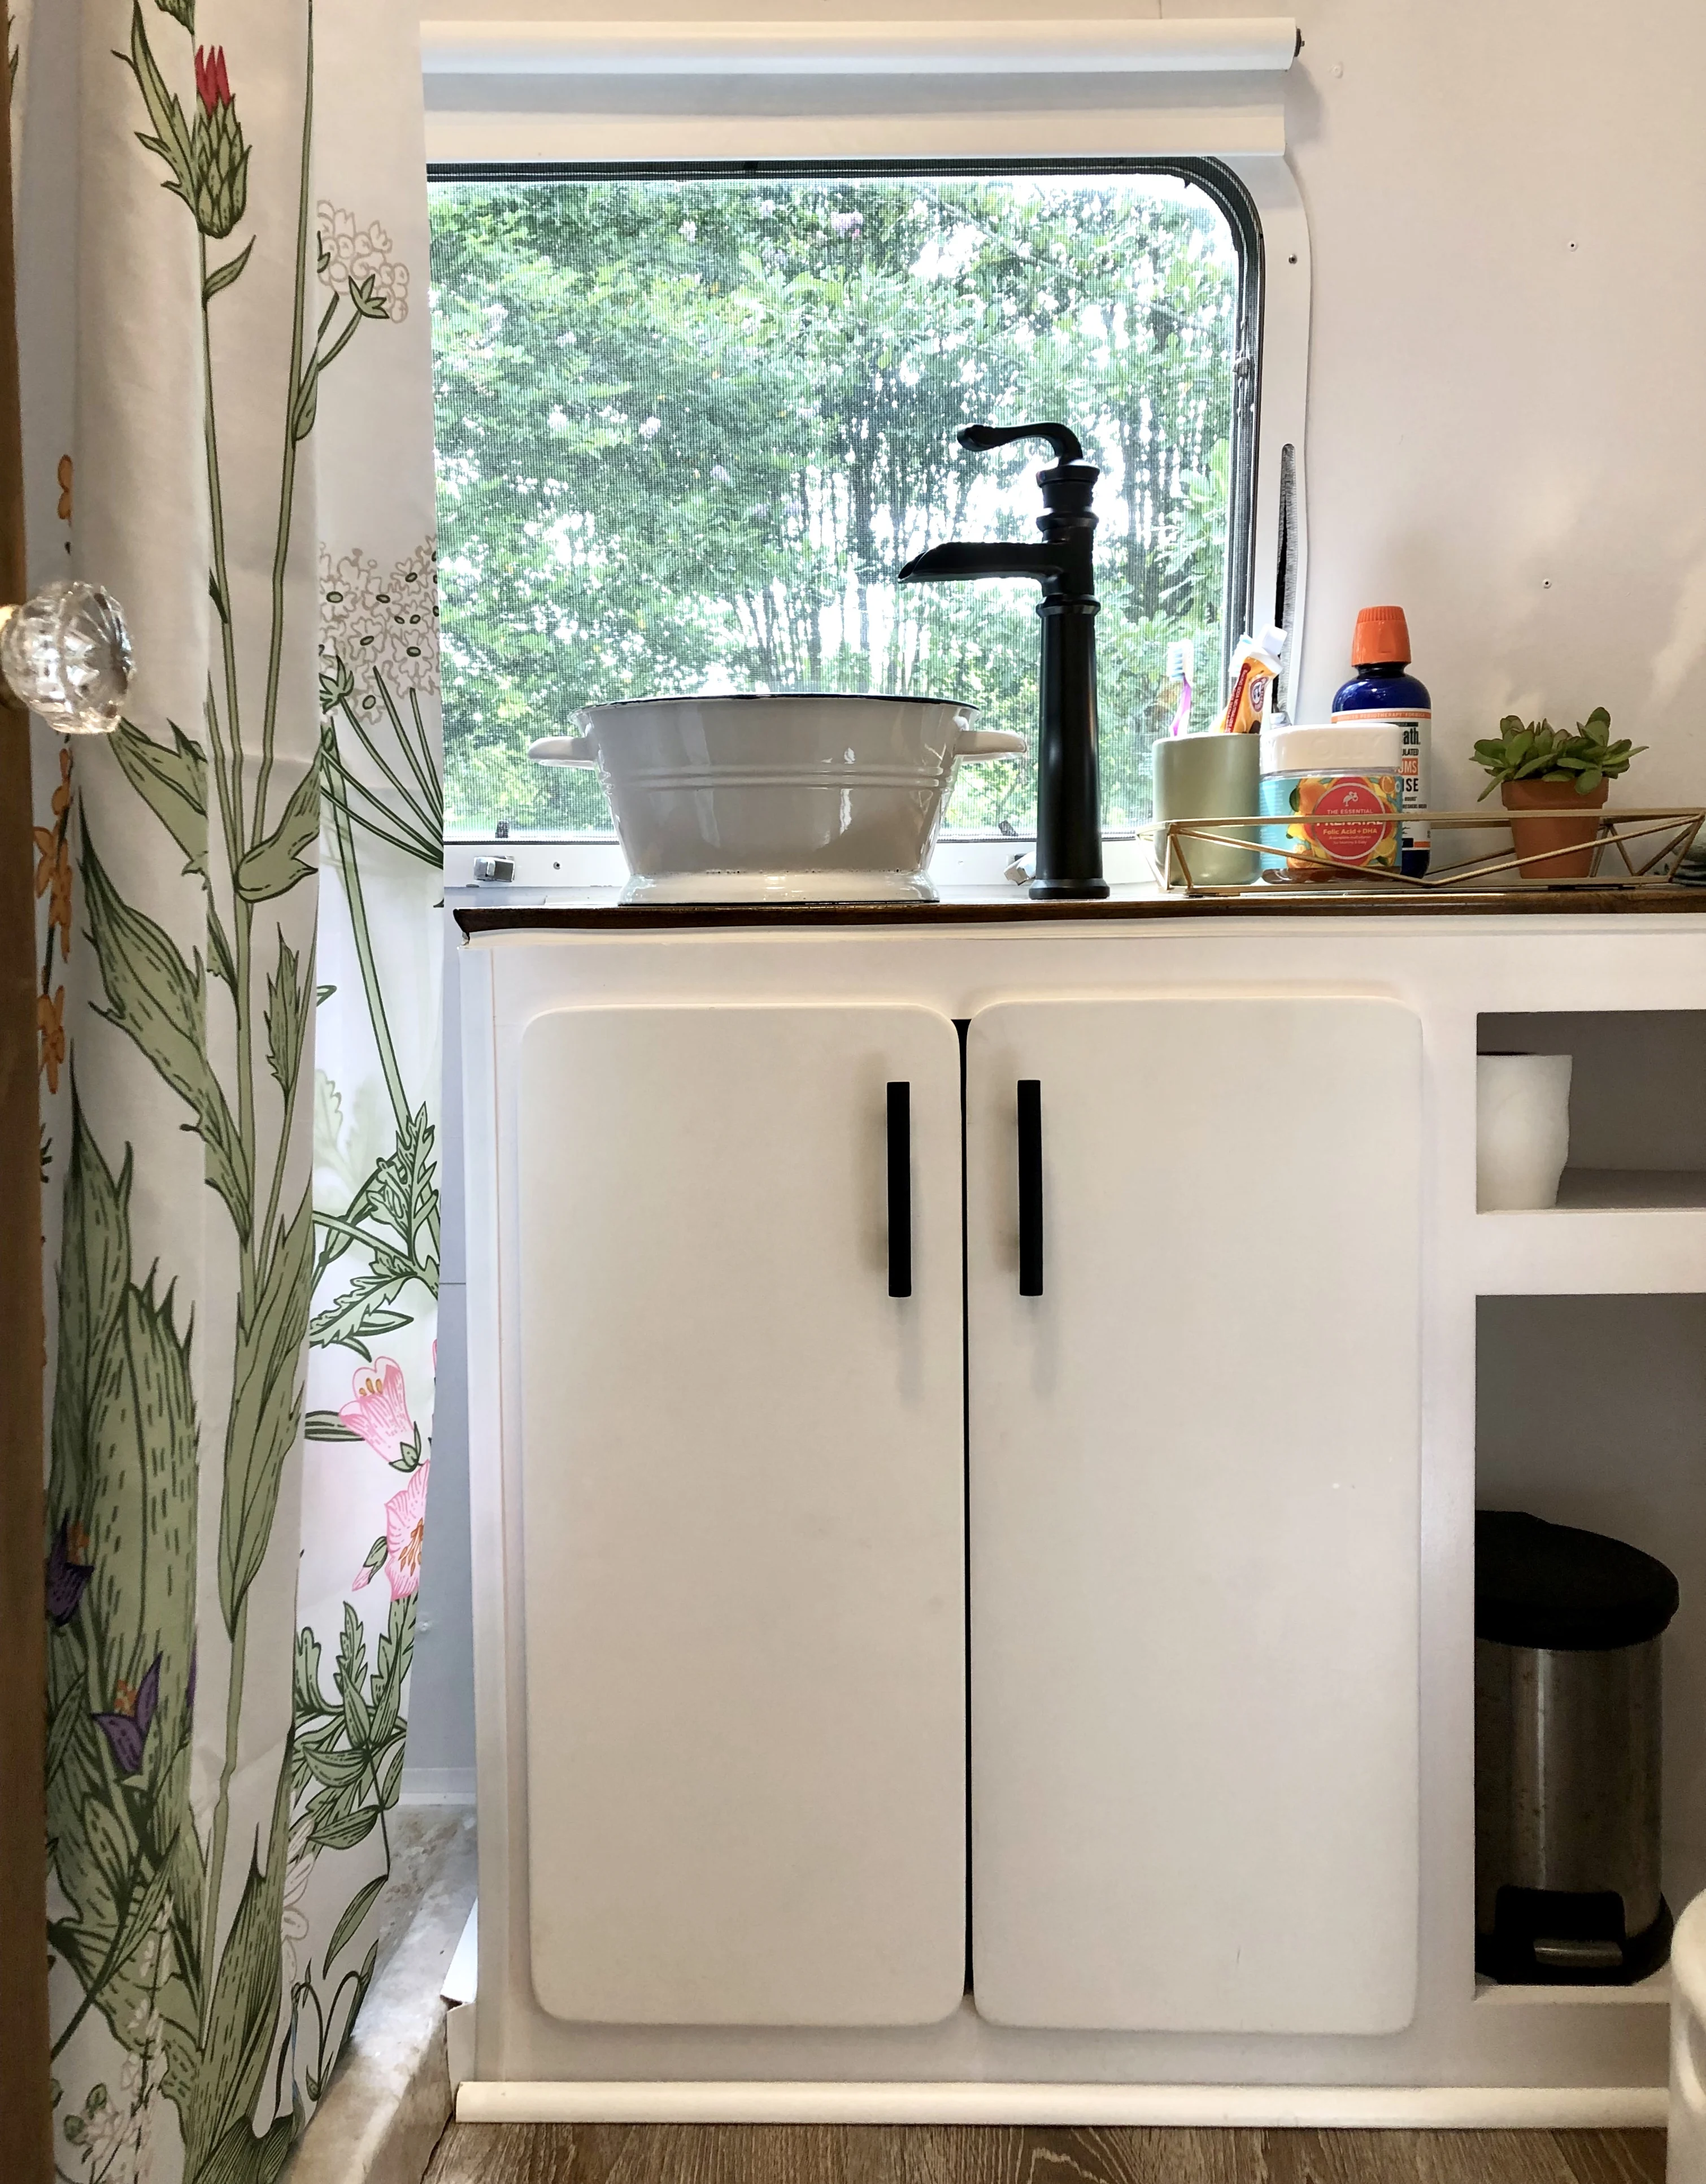
The bathroom area is separated by this cool old door we found. It’s not as heavy as it looks and I think adds a very homey feel to the space. Once you enter the bathroom there are two large closets on either side for our clothes. Straight ahead is a small custom vanity that me and Caitlin made.
We couldn’t find a small enough sink to fit, so we came home with a cool rustic wash tub and told the boys to figure out how to make it work. I added a waterfall faucet and I think it turned out really well!
We put the shower in the corner not realizing how much of a pain it would be to fabricate a custom shower pan to fit the curve, but Kyle really pulled it off. He and Tom experimented with a few methods before deciding on a combination of foam board and fiberglass.
It’s very sturdy and fits really well to the curve. The shower rod situation was also difficult in such a small space with a curved wall, but we used some leftover copper tubing and bent it to shape and it voila!

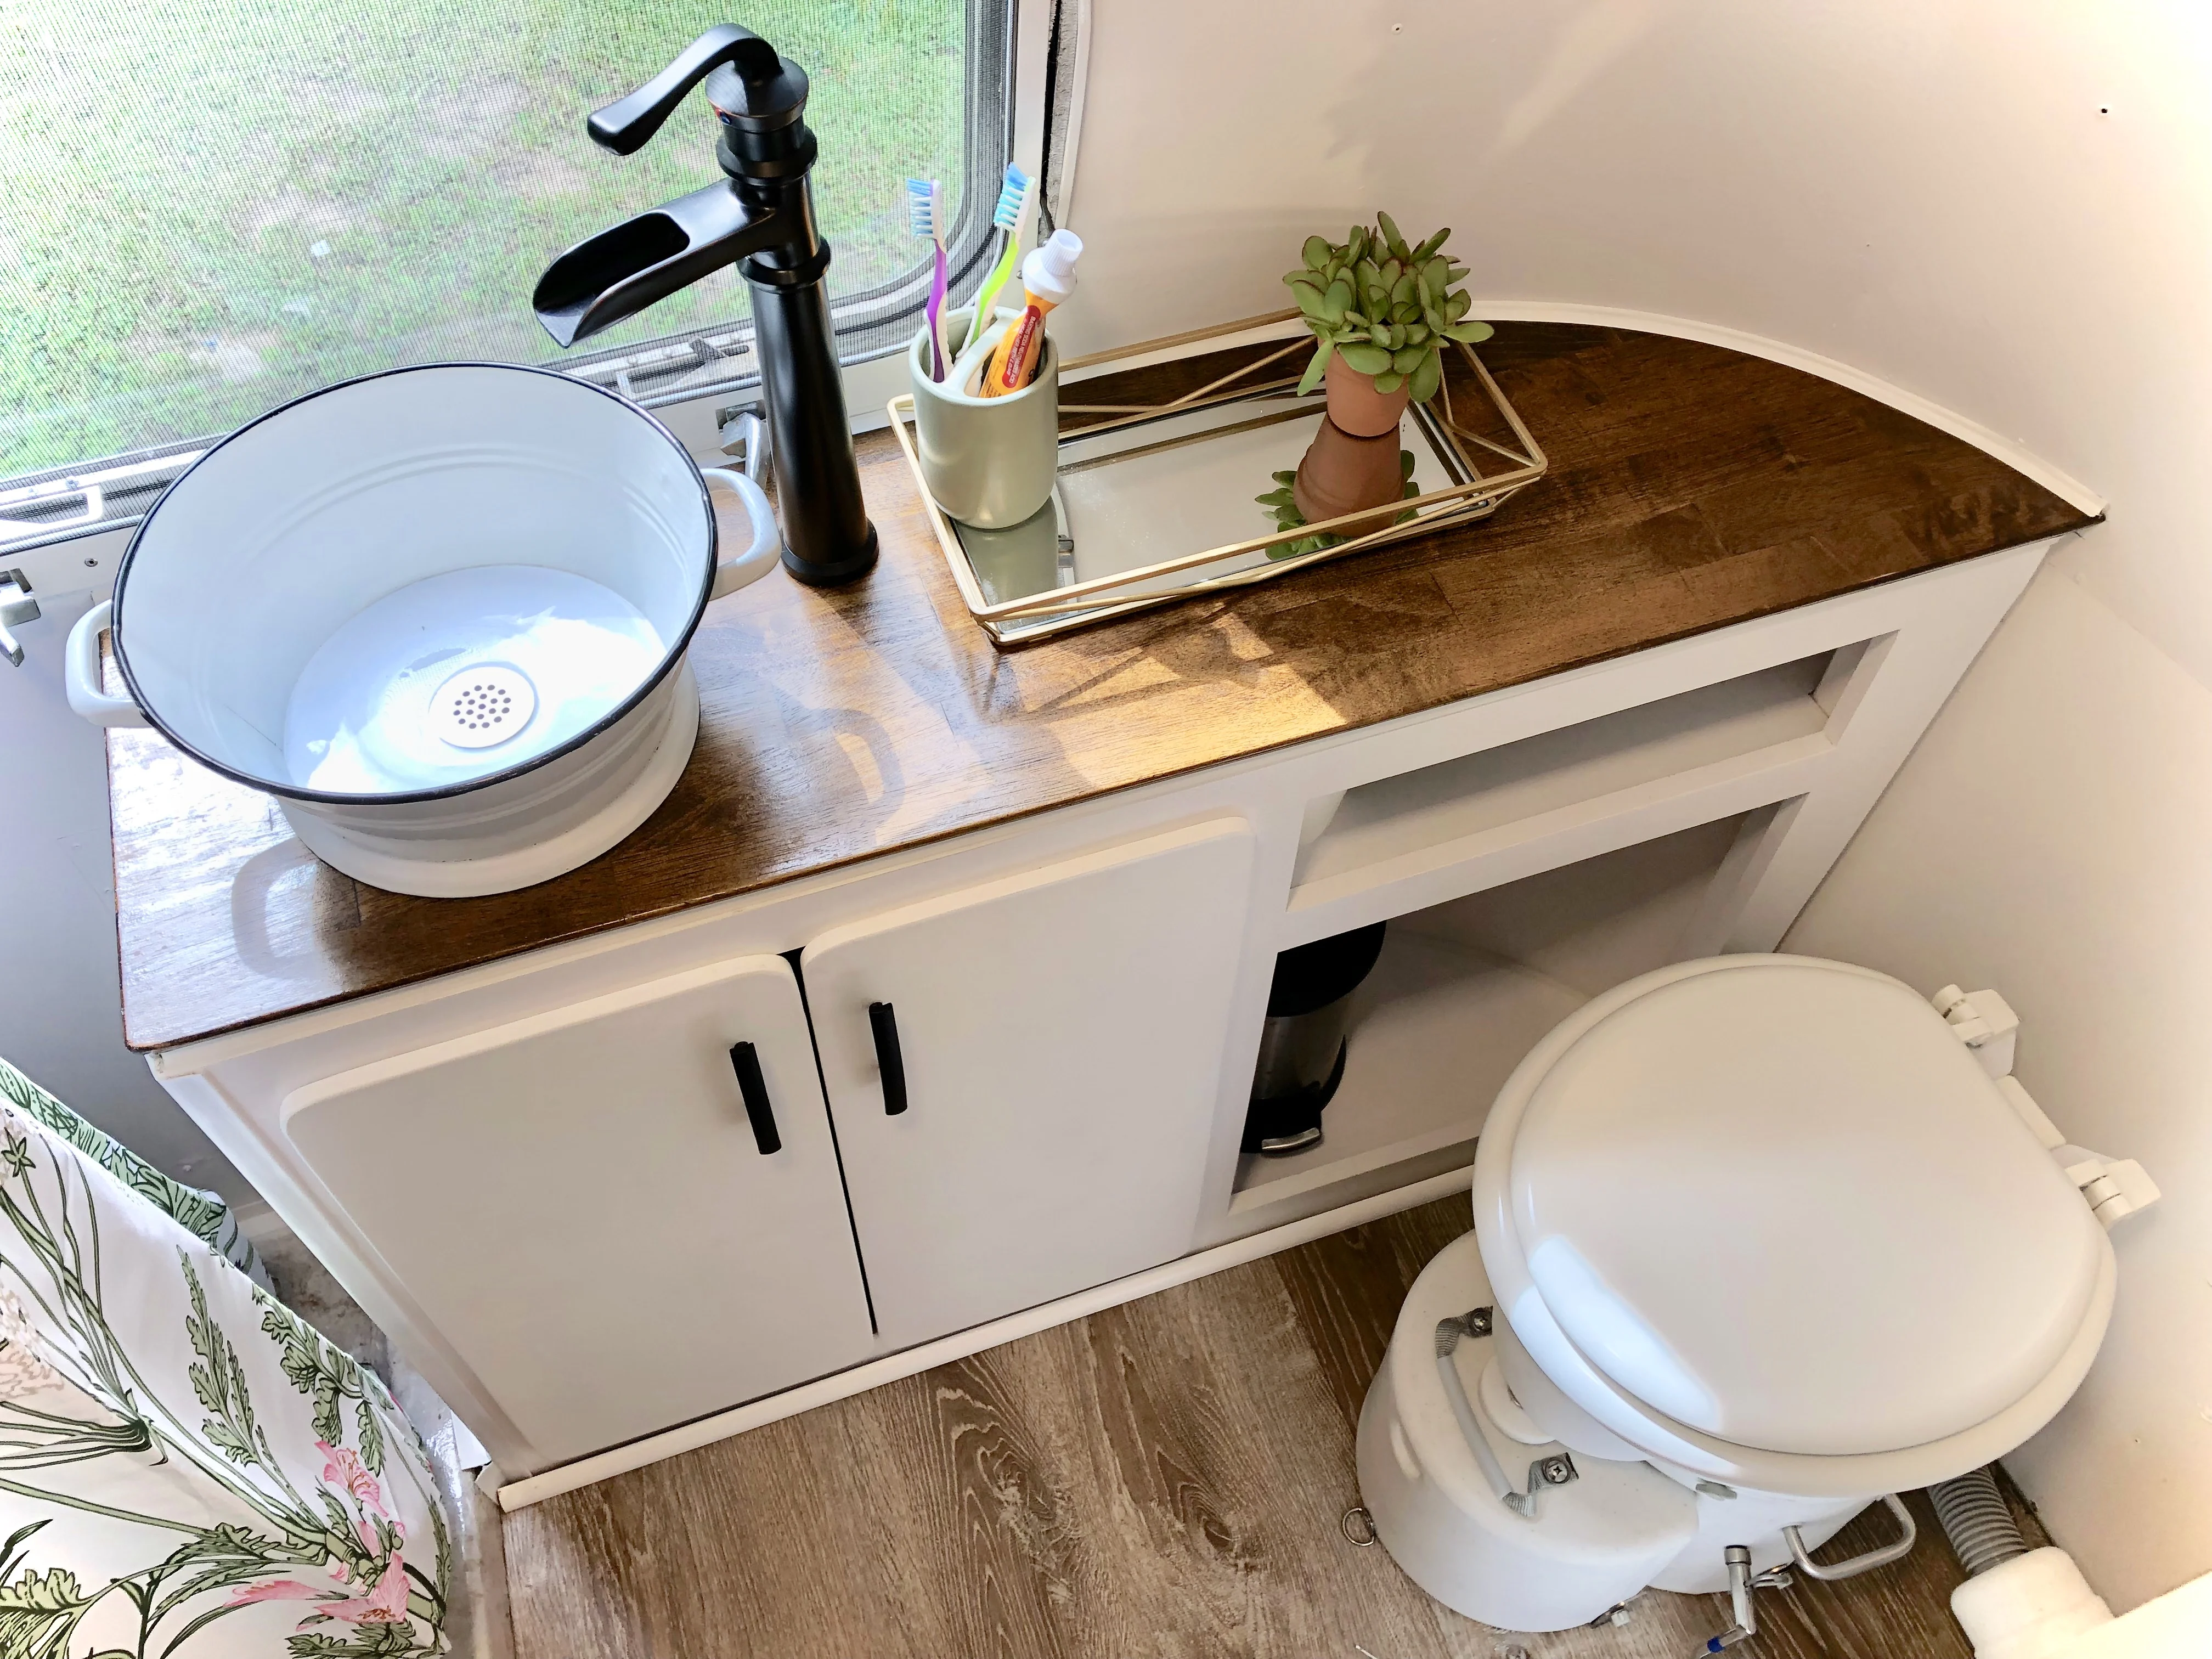
Last but not least, our new composting toilet! We went with an Air Head Composting Toilet and it fit this area perfectly. We were limited on space and the Nature’s Head was definitely too bulky, plus we wanted to try out the competing brand and see what one we liked best.
You can read more about this unit here – Air Head Composting Toilet – Why We Made the Switch
Would We Renovate a 1979 Airstream Argosy Again?
So, would we renovate a 1979 Airstream Argosy again? Hell no. While we wouldn’t trade the lessons learned or the sense of accomplishment that came with it, we’re definitely not signing up for round two.
The blood, sweat, and countless hours that went into this project tested our patience in ways we never saw coming. But on the flip side, it taught us more about craftsmanship, resilience, and problem-solving than we could have imagined.
In the end, we’ve got a beautifully restored vintage camper and a treasure trove of hard-earned wisdom—just not enough to make us want to do it all over again!
We’ll Help You Find the Best Free Camping in the USA
You should give it a try!
As a matter of fact, these free campsites are yours to enjoy. Every time you pay federal taxes, you’re contributing to these lands.
Become a FREE CAMPING INSIDER and join the 100,000 campers who love to score the best site!
We’ll send you the 50 Best Free Campsites in the USA (one per state). Access the list by submitting your email below:
So proud of you both plus 1
I realize Kyle did quite a number on the shower pan but…you might think about a remake with higher sides for bathing the baby and less splash out with the curtain. (Now that he’s expert at fiberglass and maybe a surfboard for California)
[…] think it will look great with our 1979 Airstream Argosy! The color and shape match […]
A very beautiful renovation.
love it! we are renovating a small boat and the bathroom sink is a great idea! where did you find it? thanks!
[…] & Vibin’ are a professional nomad couple. Recently, the duo renovated an old 1979 Airstream Argosy, a project which took one and a half year to complete. The couple finished the work without any […]
Hey! We’ve just bought a 73 argosy and looking for options for outside paint —
Did y’all do it yourselves or have someone local do it?
Would love to know where you took it —
Thanks so much!
Does your door close with the steps in place. Are the steps permanently attached or do you just put them in place when you set up camp?
They fold inside the door on travel days. The door shuts when they’re up or down
I absolutely love your renovation project! i want to do one on a 1994 Jayco i have. Its a 32ft. I have started gutting it will do more when i have a place to do it.
Hey, guys…You all are sure gluttons for punishment….LOL…..You did such a wonderful job on the last renov, so, I’m sure that’s why your game plans for this one……. But, I don’t think this is a renov……I think it’s a build…. But, it’s such a fabulous build….Absolutely beautiful, everything is just so perfect for the Argosy…Decor, appliances and everything, is just so grand and exciting… Proud of you, for even undertaking such a project, and before baby was born, too, and you should be proud of yourselves. Rock On!